Friday, November 20, 2015

Making Pine Cones Tute

 Hi Uni's!! Have a tute to share with you today!! Sometimes for me need leads to creativity... Such as the need for pinecones! I needed some, wanted some and had none. I was determined to figure out how to make my own that way if I ever needed some I could make them. I remembered the dies that came in Nov Small Art Big Passion KOM.. I wondered if I could use that die to make me some pinecones. Yup I sure did! Not one type either 2 different pinecones!! So let's get started making some!


What you will need..

6 flower die or punch would work too! 2 sizes tiny and small. Not sure on the exact sizes..
Petal shaping tools
glue
Brown cardstock
Shish kabob sticks (bamboo skewers)
Something to cut the skewers with
Tweezers or quilling tool

First one we are gonna make..


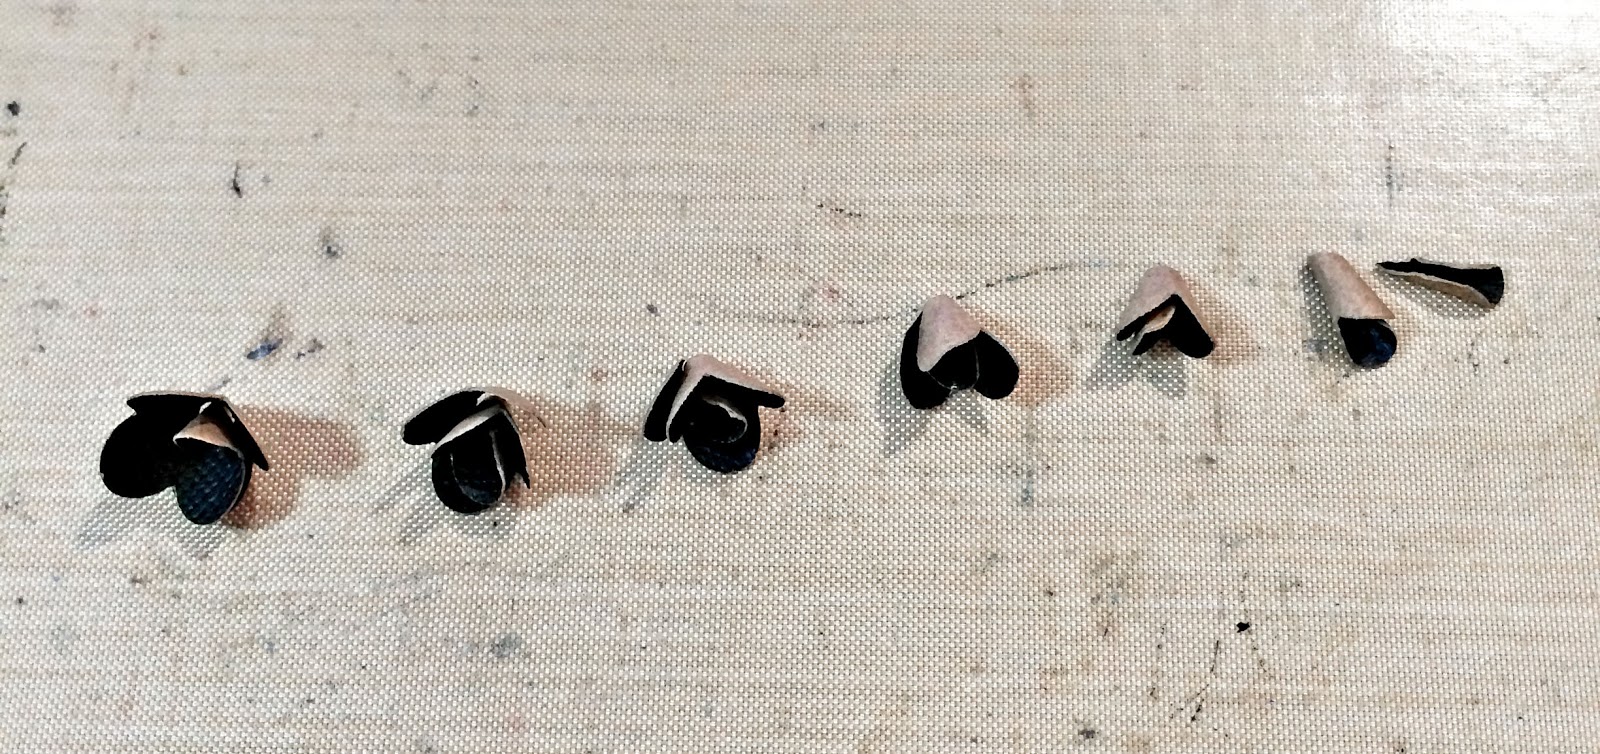
Cut 5 small and 4 tiny flowers and cut 1 petal off one and 2 off another. Should look like this..

Now get your petal shaping tools and roll with a circle motion with the big end of the tool, in the center of each of the small flowers. Then one the reverse side each petal.. The ones with the sections that have been removed roll till it looks like the ends could meet. Here are pics of these steps..


Glue the ones with missing sections so the meet. Let dry..


Get your tiny flowers and do the same as mentioned above with the exception using a smaller head on the end of the tool and graduate your pressure on them you want them stackable, but gradually getting more closed. you may need to pinch your last 2 flowers to get them tighter.. Here are the pictures of this step and final results of the shaped pieces..


Now glue and stack alternating so that you see a petal in the "v" section of the one you place on top of each layer.. Here is what this process looks like..


When the glue is completely dry take a tweezer or quilling tool bend each petal downward.. Wha la 1 cone..

Next one is very similar to the above with the exception you won't need the tiny flowers.. It will look like this when done.. Ignore the pic of the one we just made. LOL Thought I had a pic of it solo.


Now punch or die cut 5 of the small flowers. Then punch a hole in the center of each. Then remove 1 petal out of one, then 2 out of another one, then cut one in half. The 2 you have left just cut a slit to your punched hole between 2 of the petals. Yours should look like the below pic..


Now get the discarded pieces from the 1st flower (single and Double petal) and roll them with a quilling tool or tweezers. Then roll the larger pieces pictured above. They should look like the pictures below..


Now stack on the skewer from large to small gluing and rotating as you go.. I applied glue to the inside where the hole was as I slid each piece into place it helped with the glue on the next piece. You may want to do a dry run before gluing so you can mark on the skewer how far down you wanna go and mark it with a pencil. The very tip end of it you will glue your single piece to hide your skewer. Also make sure your alternating so that each empty space you see a flower petal. Here is pics of this process..


   Now just clip off your remaining piece of the skewer (save for later projects! ;) )You may want to put just a little drop of glue on the last bottom petal to close off.

Here is a tag that I made with the above pinecone...


Products used to make Tag,

CTMH stamp (title)
Gesso

Thank you for Joining me today!


Monday, November 16, 2015

Do You Wanna Build a Snowman?! Petaloo and Canvas Corp

Hello all of you Petaloo Fans out there in cyberland! We are teaming up with Canvas Corp this week! Whoot Whoot! I have a holiday project to share with you using Canvas Corp Burlap products and Petaloo flowers!!! I have also put together a bit of a how to make your own as well. Super excited about it too! Here is the project..
IMG_2352
Well actually she is a snow woman! LOL A caroling snow woman.. But I went with snowman. She is a tall one too! Her height is over 16 inches tall! A bit of a challenge to fit in the details in the photo. No worries though. I have close ups too. I wanted to take you through my process on building her so you could make your own if you would like. So let's get started shall we?! Warning long post!

First I started with a Canvas Corp Burlap bag that came in the collection sent to us to play with. I started out using a Crafters Workshop snowflake stencil and misted on some Tattered Angels mist in silver sugar let dry. Then went back over the stencil using gesso then let dry again. I removed the handles and tucked in the corners of the bag. Here are some photos of this process.
IMG_2317
  IMG_2318

IMG_2319

IMG_2320

 After I had the bag covered with medium and dried completely. I then went around the top with a crop a dile, and punched holes, and threaded some jute through, so I would have a way to close the top around the head. I used a plastic bowl of pebbles that I had bought long ago to use as a weight so the body would stay up right. I placed this in the bottom center of my bag. Then I used the stuffing out of a old pillow that was torn and no longer in use to fill the bag with after I added in the bowl of pebbles. Here are photos of this process..
IMG_2321

IMG_2322

IMG_2324

 Went shopping in my hubs closet for a pair of white sox (shhhh He will never miss them :) lol ) that I used one to make the head with. Stuffing in more stuffing in the bottom of the sox about half way. Tied a knot in the center and finished stuffing the rest of the way. Using a rubber band closed off the end. I used tacky glue to seal the edges of the sox flat laying the edges to hide the rubber band. Then placed the stuffed sox halfway leaving one stuffed part out of the bag and one in. I packed a little more stuffing around the inside piece and pulled the jute really tight and tied in a knot sealing off the bag so that only the top part of the stuffed sox stuck out.  Wha la Head and body! Here is a pic of what the finished sox piece looked like after stuffing it.

IMG_2323

 Now I have a body and head I needed some arms. Went shopping outside for the perfect sticks for this part. Was easy to find some we had a storm come through the night before and there was plenty to choose from! LOL I matched up the sizes and placed them at each side of the stuffed bag to see where the holes for the arms would need to go. Using a xacto knife cut the seam a little to poke my stick through the hole and sealed with some tacky glue to lock them in ( the gluing came later as I didn't quite know how I wanted my arms to look). Here is a photo of this..

IMG_2326

Time to work a bit on the face. The 2 eyes are small black buttons that I threaded through. The cheeks was done with pink chalk and the mouth is a strand of the burlap that I pulled out of a sheet of burlap. The nose was made of a little rectangle of canvas from a canvas sheet from Canvas Corp. Love all the cool sheets of colored burlap and canvas that they have! The nose was colored using mist in orange and a orange marker to add in a bit more color. Then I glued down one edge of the colored canvas and made a cone like shape and sealed together. I pushed in the edges so I would have a flat bottom to the cone and glued to the face. Here are a few pics of the nose process..

IMG_2327

IMG_2328

IMG_2329

IMG_2330

The face looked pretty good, but I needed a hat! So I grabbed a sheet of burlap that match the body and made a little sock hat.. This was easy as pie to make. I first pulled out about a inch of horizontal strands of burlap from the sheet. Then added glue to one edge going up and down from the loose strands part. Rolling over so the glue would glue the opposite side outer edge. At this point it kinda looks like a tube. I let the tacky glue dry well before moving on. After the tacky glue was dry I cuffed the end that I didn't have loose strands on, about a inch on the cuff part. Gathered the end that had the loose strands and tied a piece of jute around this end and tied in a bow. Finished the piece off with a bit of Petaloo trim in Ivory lace around the top part of the cuff. Wha la a hat! Here is a few photos of the hat process..

IMG_2331
IMG_2332
IMG_2333
IMG_2334
I added some more of the Wide Lace as a scarf around the neck and added a big bow to the center of the tied part. Big buttons was glued down the center of the body piece with a little bit of the twine through the holes of the buttons. Here is what she looks like plain and no frills.. Over look my messy desk please.. lol Creativity in process here! :)

IMG_2335
 I thought the sticks looked like a song leaders hands of a choir and that is what made me think to make her a caroler. The sticks I did glue them last so I could shift to match whatever I wanted to do with them. So I made a song book out of a red sheet of burlap, some cardstock and some sheets of paper. Stamped the outside of the book with some Christmas stamps and snowflake swirls as borders. The inside of the song book was stamped with a music note stamp from Creative Embellishments and some Christmas song titles from my stash (CTMH).

Then the final touches of Yummy Petaloo Picks, Burlap Poinsettias in red and white. The white ones I misted with some Tattered Angels in Sheer Tangy lime. More Petaloo DIY Burlap flowers in Ivory and a butterfly that I also misted green. Final dressing was with Creative Embellishment snowflake chippies, Gesso and Aleene's true snow. For a wintery look to my caroling snow woman. Here is some close ups of the details to the finished piece..

IMG_2356

I did add in a little more of the Jute for lips to look like she was singing. :)

IMG_2355

IMG_2354

Thank you so much for joining me today! Hope you enjoyed and had fun! :)

Petaloo Products used:
Red Burlap Poinsettias
DIY White Poinsettias
DIY Burlap Blossoms
Pine Cone Picks with berries
Fancy trims Ivory Lace

Canvas Corp Products Used:
Burlap Bag
Burlap Sheet
Red Burlap Sheet
Canvas Sheet
Tattered Angels Mist

Other Products Used:
Creative Embellishments Snowflake chippies
Creative Embellishments Grunge Music Sheet
CTMH stamps
Gesso
13 Arts White and Silver paint
Aleene's True Snow


Saturday, November 14, 2015

Flying Unicorn Nov KOM OTP

 Hi all! I am sharing my OTP from November KOM with you today. It was a simple small piece, a metal wheelbarrow. I thought it would be cool to spruce it up with a dash of color. Using the 13 Art mist that came in the kit along with some silks I think I pulled it off. I wanted to see flowers in the cart instead of leaves that would normally fit the thought of the wheelbarrow. I used Flying Unicorn Adornments flower shapes to do just that. Bent them and grouped them together to create the individual flowers and then clustered them. Here is the cart...


 I also used the Prima beads from the kit and the 13 Arts Mica flakes to create texture within the clusters. The butterflies was the icing on the cake for my flower clusters. Super fun little project. Here are a few more views..


Loads of fun playing along with these OTP projects that comes in the kit. Enjoy playing with them each and every month!

Products Used:
Flying Unicorn Main KOM OTP
Flying Unicorn Adornments
Prima Micro Beads
Gesso
Silks
13 Arts Mist and Mica Flakes

Thank you for joining me today!!

Friday, November 13, 2015

Simple Stories and Petaloo

 Hi all of you Petaloo Fans out there! Here today to share a holiday layout with you using the fun and beautiful Simple Stories collection "Santa Claus and Company" Collection. Also using the Gorgeous Petaloo flowers that work Christmas magic with this fun paper!!

This paper Collection has Soooo Many fun things to use! Tags, Stickers, papers and letters galore!! Lots of fun playing with the Santa Claus and Company collection!!

It just so happens I have untouched Christmas pictures that needed to be scrapped from last year! I KNOW a whole year later!! Geez I couldn't believe that it happened either. This paper made me want to dig through that untouched stash of pics and create a layout!! I chose to do a mixed media LO. This paper can go in all kinds of directions! Here is the LO.

IMG_2305

I didn't hold back on the Petaloo Blooms either!! Totally fun creating a Christmas cluster of blooms!! I used the Textured Elements Burlap Poinsettias both white and red. I wanted a touch of green so I added in the Burlap blossoms in pistachio. But wait!! I needed smaller flowers Botanica collection Sugared Red minis and a Pine cone and Berries pick! Wha la! A yummy cluster to adorn my LO. A little dab of Gesso and Aleens True snow to turn those yummy blooms into wintery Christmas cluster! I have a couple of close ups..

IMG_2310

Easy to add details with all the cool pieces to the "Santa Claus and Company" Collection! Here is another close up!

IMG_2308

The papers had a cool Christmas Tree made of strips.. That gave me the idea of the Mixed Media Christmas tree..

IMG_2309

A pocket tag to jot down a bit of memories for my kiddos to read in years to come! The little Bells also have been decked out with a bit of Petaloo too! Just took some of the Small Trims Assortment Glitz all Red and made little bows for my bells. One last closeup..

IMG_2307

I cut the 25 out of one sheet and added it over the top of the one that was already there. I ended up covering up the original one more than I wanted too. This actually worked out perfectly. Was sooo much easier to add the snow and gesso. Just a tip though. You may want to back with some cardstock to give it more of a backing. I did and it held up pretty well. Thank you for joining me today!!

Petaloo products used:
Trim Asst Glitz All Red
Pine w/cones and Berries
Sugared Blooms minis in Red
Burlap Poinsettias in Red and White
Burlap Blossoms in Pistachio

Other Products Used:
Simple Stories "Claus and Company"
Aleenes true Snow
Tattered Angels Mists Simply Sheer Tangy Lime, Glimmer mist Barn Red
Lindy's Cathedral Pines Green
Kaisercraft Stamp Distressed edges
Creative Embellishments Stamp Snowflakes
Tim Holtz Distressed ink in Tea Stain
Silks in Emperor's Gold
Gesso, sequins and Drywall tape

Hugs Tammy! :)

Thursday, November 5, 2015

Mixed Art Nov KOM Flying Unicorn Canvas

 Hi all! Sharing My canvas made using the Mixed Art Nov KOM. It was a fun healing type canvas for me.. Sometimes it's hard to move forward with your life if things keep bringing you down. This year has been exactly that for me. It's just been one thing after the next happen that somehow has affected me in different ways. So that is what this canvas is all about for me.. Just a small place to let my soul scream what it feels. Basically finding peace with in the storm. That is very hard to do sometimes. This little canvas was just the outlet I needed, and the colors fit my mood very well. From dark to light. In a very simple way. Here is the canvas...


Love the Prima path stencil that came in the kit. I used that as inspo for my quote. I used the Petaloo flowers, 13 Arts Mica flakes and Flying Unicorn Adornments to help add texture to my canvas. I also used the microbeads from Prima as well. It was a very fun canvas to make! Here are some close ups..


 Always a joy to play with resin pieces! This kit came with plenty too!! Here are a couple more close ups!


I did add in a small amount of Silks in iridescent blue to make my path stand out a little more.

Products used:

Nov Mixed Art KOM

13 Arts Mediums

Prima path stencil and stamp

Flying Unicorn Adornments and lace

Petaloo Flowers

Silks 

Thank you so much for joining me today!!


Sunday, November 1, 2015

Creative Embellishments November Challenge


Hi all!! Its CE Challenge time!! Love fall and this month's Inspo pic just speaks fall!! Browns and golds fit perfectly with blues and greens! Here is this month's Inspo pic..


Here is my project using the golds, browns and greens and of course blue!


 I made a sweet little canvas incorporating the Butterfly flourish Gears and 3 Inch Clock face.  Treatment was coating with gesso then splashing with color! This is actually a 5x5 canvas but I wanted you to be able to see the details of the chippies. I edged as much as I could with a little inker. Mixed Media fall FUN!!

Here are a couple of closer ups lol..


Love that quote, sometimes you just need to stop and take all of natures beauty. 

Creative Embellishments Products Used:

3 Inch Clock Face These are like Lays potato chips! I so get more than one! FAVE!


Other Products Used:


Thank you for joining me today!! Hugs all!!

Saturday, October 31, 2015

So Sweet LO with Creative Embellishments!!

 Hello CE peeps!!! Here today to share a sweet LO of my sweet baby cousin. Using yummy Creative Embellishments chippies and stamp! This month was perfect month again as the Flying Unicorn November KOM had CE chippies in it!! Whoot Whoot!! So snagged a pic from my cousin's FB page and the playing began. Here is my LO..


I used the gorgeous Heart Dangle as a base for my main flower cluster to set on top of. The treatment that I used was simply applying white gesso and a touch of Emperors Gold Silks. I used the same treatment on the 3 inch Clock Face. I cut the clock face in half and used it at the top and bottom of my LO. Make those chippies go farther!! The Distressed Chevron stamp worked perfectly to pull the pattern of her cute little top onto the LO. I used Tim Holtz Picked Raspberry to stamp with. I lost some of the pattern in the lower part of my LO from the mists. How about a couple of close ups?


She is such a cutie pie!! Always a joy to get to scrap a pic of her!! She's got a baby sister on the way weeeee!!! Fun times playing with pics of them!!


 The colors of the LO reminds me of tutti frutti! LOL Sweet fun!!

Creative Embellishments Products used:

3 Inch Clock face

Heart Dangle

Distressed Chevron stamp

Other Products used

November Flying Unicorn KOM Featuring studio 75 papers

Lindy's mist

13 Arts mists and molding paste

Prima Stencils

Faber Castell gelatos

Petaloo Flowers

Shimmerz mists

Silks

Tim Holtz distress inks

Flying Unicorn lace

Thank you so much for Joining me today!!!!