Monday, March 14, 2011

*****Nurse's Rose Tute*****

I am sorry about posting a little later than expected. I hope you like it! Tiffany this ones for you girl!!!
Supply list
Card stock
Circle or scallop punch sizes I used was 1 1/4" and 2"
Tourniquet cloth or I think cheese cloth will be close.
Sissors
Straight pins
Buttons of choice
Optional: Ink in a spritzer bottle to color petals. I used the CTMH bottles and ink colors used was Lagoon, Pacifica and Pear. I like mixing my own colors. Use the Create a shade Pearl paint to give a little glitz if you want.

Step 1 Circles
Punch 1 size circle out of cardstock for template. You will need 33 circles to create this flower.
Each petal will be 3 circles. The bottom of the flower will have 6 completed petals and the top part is 5 completed petals.
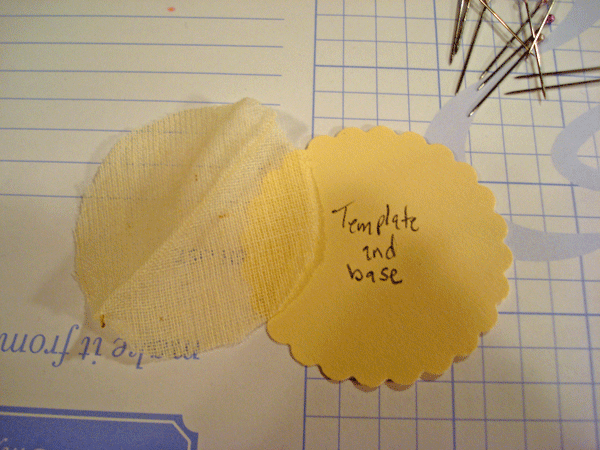
Step 2 Prep for assembly
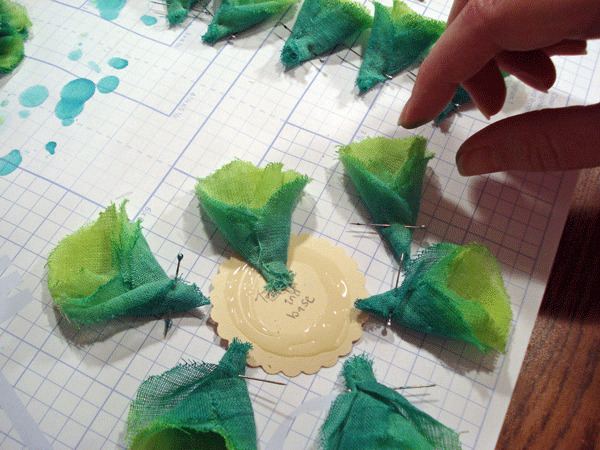
Place cut circles in stacks of 3 for assembly of petals. I also used my punched cardstock circle as base
(double duty)

Step 3 assembly of petals
Take your stack of 3 circles and fold as shown and use a pin to secure after folded. Do this to each stack of circles.

first fold

2nd fold

3rd fold now your ready for your pin. Add it to the bottom to hold petal for arranging or coloring

Step 4 coloring Petals **optional**
Now is the time to color them if you like. You don't have to because the natural color of the cloth has a vintage vibe. I colored mine. I used the lite color at the top of the petal and dark at the bottom or were the center will be. On the large flower I used 3 colors. On the small one I used 2 colors. Let dry after coloring.

Step 5 attaching to base
Apply glue on base. Remove needles before apply them. Bottom layer is 6 petals and top layer is 5 petals. Make sure you stagger the top 5 over the bottom 6. Like shown below.

Step 6 center of flower
After all petals are attached then pick a button of choice to complete your new flower.
Here is all 3 I made doing this tute plus the one that I made earlier.

The smaller ones are the 1 1/4" circle punch. The Larger is the one that was a scallop punch. Here is the first one that I made.

Thanks for stopping by!! I really hope you like them. Good night to all and God bless!

Sunday, March 13, 2011

Thoughts and Prayers Going Out To Those in Japan

As I sit in the confort of my home safe, kids safe and all seems to be well at the moment. I see the images of the devastation that came from the earthquake and tsunami. I pray for the ones missing and the lives lost. God be with you all.

Sunday, March 6, 2011

My Mom's Keepsake box

First, let me say thank you to all that has kept my cousin and her family in prayer. She as of last word is doing better may get to move out of ICU! That is wonderful and we are greatful to God that he is allowing us to keep her in our lives! She had multiple brain aneurisms. Most do not go on after this happens and we are all very aware of this. Please keep the prayers going she is still not out of the woods yet, as the doctor has told us of the possible complications of the surgery. Lisa thank you for your very kind words and prayers as well!! Hugs to you!!
On to my mothers box..
I had a fun time doing this box. Its always fun to make things for those you love and I do love my mom very much!! This is the top of the box. I keep saying CTMH, Prima and Mr Holtz is a wonderful match!! LOL

I hand cut the "R" it is actually our (CTMH) Baroque Alpha. I scanned the carrier sheet and used PSE to get it to the size I needed then cut out the negitive areas and laid it over our New "Wings" paper I so love this paper as you can tell!! LOL The Box itself is also CTMH keepsake box. I think that the box isn't currently unavailable. I think it is a seasonal item. Here is a close up of the top.

The flowers are mostly Prima. I REALLY LOVE Prima!!! The Leaves are ones that Lisa has put up on the Swirleydoo's Forums here. I hope I did that right.. Still learning my way around the blog world.. LOL Also the littler leaves are from the CTMH "Just blooms". Here is another angle.

I always coat my boxes with Royal Coat Decoupage Finish before I add The embellies to them. Butterfly is Prima and the Swirl under it as well. Now for the tour around the box. Front of it.

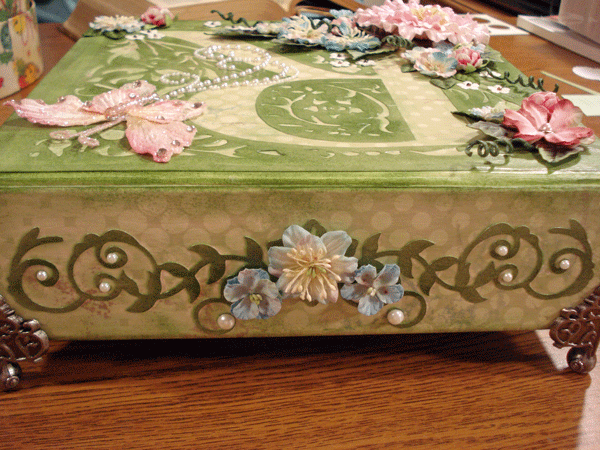
I used the Tim Holtz feet as well as his bracket that shows my mom's name. I used my cricket to cut out the die cut using the MTC program. I got the SVG file from SVGCUTS.com The Pearls are CTMH Opaques I used both sets. The other sets I used on the tiny blooms to give them a center. Here is the sides and back to the box. I used the MTC program and SVGCUTS for them as well as a dash of Prima..

leftside

back

This is the right side.
I have also wrote a poem to put in the box on the inside. The title is "Little things".
Little things to put in a box.
Little things you don't want to lose.
Little things that give your memory a start.
Little things to keep close to your heart.
Little things to make you smile.
For those little things are big things every once in a while.

Well this is a long post and it is getting late. Going to do a tute on the "Nurses Rose" for my dear sweet friend and scrapping sister Tiffany!! She is my Pastor's wife and my very dear friend. She is a Nurse, so this one will be for her!! Good night all and God bless!!

Wednesday, March 2, 2011

PRAYERS NEEDED PLEASE

Hello all of my scrapping friends. I have a request from you out there in the cyber world. Please pray for my cousin. She is in ICU at this time. She has 2 sweet kids and they need thier mother. I know that the doctors and nurses have done what they can. Now it is in the good Lord's hands. I know that prayers work and believe in them. Her name is Christy and I love her and her family very much. They need all the prayer that we can give them. Thank you all very much..

Tuesday, February 22, 2011

2 New Blooms

Have you ever had sooo many ideas rolling around in your head that you couldn't focus on the project at hand (my moms box whoops)? Ok so this is what happened.. This past weekend My DH was sick and I was totally pooped from a loonnngg work week! Last week I went to Walley World and did my notorious journey to the craft dept while shopping (this drives my family totally nuts)!! LOL Any who I found some awesome finds in the ribbon isle. Some ooh lala vintage looking lace ribbon and sooo many other different types that it had my head spinning!! Needless to say I got several spools of differnet types.. You gals that live close to a craft store BE HAPPY! Because my closest store is a hour away. With gas prices yuck!! So sometimes ole Walley World is OK.. Then I got one of my magizines in that showed the new Prima line.. THAT is what started it all I had some new cool things, prima, the sun is finally shining, the temp is starting to come up and I can finally see grass coming on!! WHoo hoo.. I know I am starting to get carried away.. But I came up with 2 new flowers! Now one is not made of any type of ribbon it is was truely brought on by looking at the new prima line.. There was one flower that really caught my attention. Don't know the name of it yet though. I used something totally out of the ordinary.. Hint.. ummm... you might have some on hand and so do hospitals.. Leave me a comment and let me know if you figure it out.. HEEhee
Ok here is a pick of the 2 blooms.
The first one I did was the rose.. I was thinking about calling it a rag rose but that sounds kinda gross and we all know that roses are not gross. What do you guys think? Here is another view.

So stumped.. Thinking about doing a tute on it let me know if ya want one!! Ok here is the other one made with the BEAUTIFUL lace I found.
I must work on moms box this weekend before she disownes me! Naaa She loves me and I love her!! Ok see you guys later. Don't forget to let me know what ya think!

Wednesday, February 16, 2011

I'm Soooo Excited!!!

 After a long hard day at work yesterday I came home to some great news!! I check my email just about everyday for one reason or another. I got a email stating that they (Scrapbooking News and Review Magazine aka SNR) was gonna publish my card in their Magazine in March!!! Ohh my goodness I couldn't believe it!! As you can probably tell I am a LITTLE EXCITED! LOL So I did have to take my card off of my blog. It will be back a month from the 13th of March.

I do have 1 more project to do and it is for My Mom. I am doing a Keepsake box for her. Hopefully I will get some time to work on it this weekend and get it posted soon. Then on to the layouts!! I have a whole bunch of new supplies from CTMH that I am just dying to dive into.. BUT MOM comes first!! LOL

I also wanted to say a GREAT BIG THANKS to everybody that has posted wonderful comments on my blog and for all of my followers as well!!! I hope that I always keep you interested and happy.. See ya soon!

Saturday, February 12, 2011

Ok Here Is The Tute on The Sunflower

This is a long post. So bare with me as I like to be as detailed as possible.
Supplies needed:
Paper trimmer, Paper and Cardstock(for center holds shape better), Scissors, Quick drying glue(like liquid glass), Pop Dot, Circle Punch (I used 1 1/4 inch), Wooden stick to help shape centers.
Optional Supplies:
Ink Pad, Mouse pad or Embossing pad, Embossing tool, and Ink pen with large rounded smooth end.

Step 1 Cutting Squares
Petals: cut 8  1 1/2"x 1 1/2"squares, 12  1"x1"squares use paper for this or I did anyways.
Center: cut 19 1/2"x1/2"squares.
Base: Punch 2 circles with punch.

Step 2 making the Petals
Cut all 1 1/2" and 1" squares like shown below on guide.

Step 3 Optional Texturing of Petals ( I say optional because some may like ink and some may not and so on)
Take all petals and apply ink.

Then emboss in veins.

Then use ink pen rub opposite side to create a kinda curling of petal effect.

do this on all petals

Step 4 Making the centers
Use stick and roll centers as shown. kinda looks like a waffle cone.


completed close up

do all 19 1/2" squares.
Step 5 assembly of flower
Take 1 circle and glue around edges as shown

Then place large petals around one and small petals around other circle (note on small petals leave three small petals to add on top of small petal stack as shown below).

small petal assembly

add the 3 in a top side, side arrangement.
now add pop dot in the center of large petals and add small petals on top try to keep centered.

now fluff the small petals a bit all the way around to prepare for the centers to be added.

Step 6 applying the centers don't get in a hurry and start glueing because I have made it easier. You may need tweezers to help out with this part. Take 12 of the 19 and arrange like shown.

Now apply glue in center and litely push them into the glue just catching the edges. like shown

Now take 6 more centers placing them like shown into the glue puddle.

Now snip just a little bit off the last piece and add as shown.

Now you have a completed Sunflower! If you want you can add some chalk to pop out the veining if you want. Hope ya like it. Sorry it is so long but I didn't want to leave anything to be questioned. Leave me a comment and let me know if ya liked it. Or better yet become a follower! If you use please give a gal some credit for the work.. LOL goodnight all Enjoy!