Friday, June 8, 2012

**Sweetheart Vine***

Hello everyone!! Tammy here! I have finally got my vine tute ready for you!! I hope you enjoy it. Please note the whole punch isn't needed.. It has been a awhile since I have make one and for some reason I thought I needed it.. I did forget to add a jewelry wire cutter. All well lets get this going! It is a very long tute so hang on with me.. lol Please be sure to read through the entire process before you start.

Supplies needed:
 I used my Cricut to cut out the daisy flower. I did a tute on the big flower that matches. There are other flowers out there that have 7 petals needed to make this flower.

Birch leaf punch, Star shaped flower punch ( I don't know the name of it but it is by paperablities)
Stems, Floral tape ( I used brown in tute but there are also other colors available)
CS, Ink for edge inking, mists I used the one pictured and some lindy's for the leaves and flower cap.
Wooden stick, glue (quick drying), Paper piercer, needle (one with a head on it).

Cutting and punching and coloring
Cut out 15 1 inch daisy flowers, 3 punched star shaped flower, 10 leaves.
Color your daisy flowers by inking edges and misting. Note you will need to do the folding part right after you mist. They need to be damp not wet when you fold them. Shape leaves with your thumb nail by creasing with the design of the leaf. then mist them as well. The mist helps highlight the creasing. Also color the star shape flower the same color as the leaves. Pierce the center of the star shape one and kinda mold around your shaping tool. Here are the pics of my colored leaves and flowers.


Assembly of the flower:

You will need 4 for the petals and 1 for base. Fold in half and side to side, the back should be in the shape of a heart. Then glue the 4 pieces around where point of the petal faces middle (Note pieces need to be dry to glue them down). Do not glue center. After pieces have been glued and the glue is dry you are ready to pierce the hole. Take 2 floral sprays and cross them and fold in half, then twist them tight to run through the pierced hole. I used a needle to help me get the spray through the hole. Here are pics of this process.


Now you are ready to take the center and attach to stem. Twist around the stem and place a small amount of glue to hold it in place this adds extra stability to the flower. See pics.

Here are some photos of the stem lengths. I just eye it really. You need one longer than the others. The longest one will be the top part of your vine. I do the same on the leaves. They however don't need to be as long as the flowers. Once you do the step up above then let them dry and glue the leaves to the stem. Note glue the stem to the back part of the stem. I got in a hurry and did it backwards. All well it turned out ok anyways. Here are the photos..


The extra stems laying below the leaves are for the swirlies. Here is pics of how I made them. You basically just wrap them around your wooden stick leaving a little unshaped so you can attach to the vine. stretch them out a bit,not to tight of a swirl. Here are those photos.


Vine assembly:
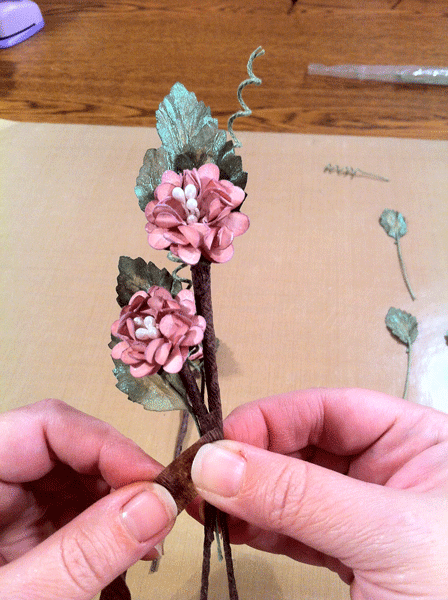
I didn't show the gluing of the leaves to the stem, thought that is a pretty easy step. After the glue is dry on the flowers and stems and leaves and stems you are ready to start the wrapping process. Take your floral tape and wrap around the flower and stem. Starting at the top and holding in place as you wrap the tape downward and pulling at the same time. The pulling on the tape makes it sticky and releases the glue. Once you have wrapped your flower then add your cap. Next add 2 leaves to 2 of the flowers and one on the last one left. Hold the leaves in place with the tape ready to make your first wrap around them. Again pulling down at the same time. Go down the length of the leaves stem. No need to go all the way down the stem again. Here is the pics of this step.


Continue to wrap all the way down on this step. Then add your cap. Here is the pics for that..

Now add your leaves as stated up above.. Here is the pics of that process..


Just wrap to the end of the stem on the leaves.. Do all 3 flowers this way.. Here is what they should look like..


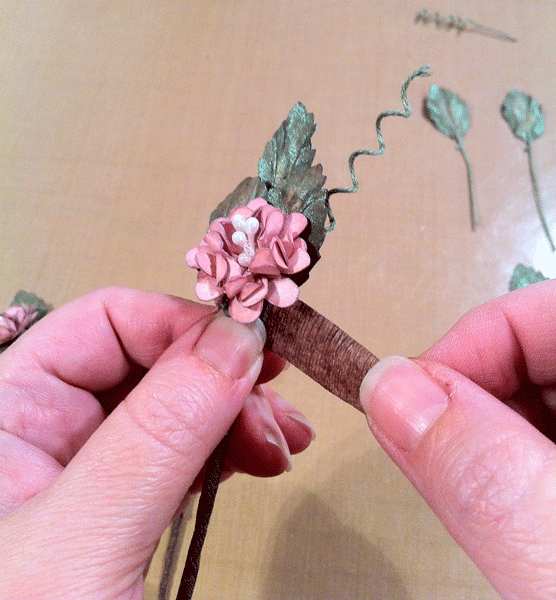
 Now take the longest one and attach a swirly and a leaf to the back of the bloom. Then wrap down about 2inches. I just eye it.. Then add the flower with the single leaf to the right with a leaf and a swirl. Pulling downward. Wrap around once or twice then add the flower on the right. After you wrap once then add a leaf and swirly in the back.. Wrap around whole piece twice and add a leaf below the one on the right in the front. Then wrap around whole piece once and add the last leaf on the left in the front. Continue wrapping all the way down till the whole piece has been wraped. Tear off tape and curl the end. If the tape tears no worries just start wrapping in the same spot that you stopped at. Here are the pics of this process and the final result...


I know this is very long but hope you find it worth it! Hope you enjoy!!

Thursday, June 7, 2012

**June KOM" Ocean Breezes and Summer Skies" Projects**

 Well let me tell ya I flat out had a blast with the kit this month!!! First of all it was a packed and I mean a packed kit!! My head was spinning at all the Yummy scrapping goodies inside this kit!! Here is a couple of projects that I did! More to come!! LOL


 I went punch crazy on this little ditty! LOL Corners and edges and circles! All the flowers you get with the addon kit and the Main kit well let me just say OH MY OH MY! Love love them! This LO has Prima gorgeous yellow blooms and Petaloo white ones. The little bitty yellow ones also came in the kit! The Kaisercraft large die cut in the background just screamed to me to punch and frame it with the yellow CS that came in the kit!Then I used some of the Prima Fairy bella PP and fussy cut out the flowers in the pp and used a strip across the page. The window that I made  is a new thing for me I embossed  with a cuttlebug embossing folder through my new toy, my Vagabond! Oh yeah!! lol Took some of the CS from the kit embossed it then used some Picket fence distress stain on it. You can find the stain in the Flying Unicorn Store. I hand made the little blooms at the top of the page to mimic the ones in the Prima pp.. Let me get ya a few close ups..

Isn't the Prima flowers just Yummy!!
 These colors are sooo awesome together! Love the colors that come in this kit and it lives up to the beautiful name that Alda gave it! "Ocean Breezes and Summer Skies" Was perfect!!

 I love the water paints that came in the kit too!! I stamped the butterfly with my Kaisercraft stamp and colored it with the paints. It is up above the awesome chippy that came in the kit. The chippy comes in the kit as well!!

 I took those paints a little further though.. I had a idea back in April and tried to use some Tatter Angels Glams and glazes on some velum to get a stained glass look.. Well that didn't turn out so well.. The velum curled way to much and it was hard to control. I had already bought a picture from the dollar store that I had planned on overhauling and reusing it for this project. Fast forward to this kit and the paints.. It worked!!  I was thrilled that It came to life for me! I used a stain glass pattern that I found on the web HERE is the link. There are some awesome patterns there!! Here is my project that I did with those paints..

 I have it here with a white back ground. I took the frame and used crackle paint on it. It was black and not very interesting.. I then the mat was white and plane, not interesting either.. I used some TH tacky tape on it and some Vintage Photo distress stains to color the tape. Added some Dusty attic Ornate corners on top of the glass, after I had the mat and the piece in place. On the velum piece itself I used those paints to color it with, Oh how it shimmers.. Then for the lead lines I used some black metallic paint. I also used some of the water paints to color the Dusty attic chippies with as well. I just painted them with gesso and then the paints. I also edge distress with a little Distress stain as well. The flowers are Prima, Dusty attic, Petaloo and the vine is Petaloo. You can find these additional items in the Flying Unicorn store.

 I also wanted you to see that I left the back opened and covered it with a transparency covered the remaining back, with a sheet of craft paper. Here is a pic of that..


This was a fun project to create!

 So have some fun and get creative!! See ya soon!

Sunday, June 3, 2012

****June Kit of the Month***

OCEAN BREEZE & SUMMER SKIES
JUNE KIT OF THE MONTH

The wait is over, and its time to introduce Ocean Breeze and Summer Skies, our June 2012 Kit of the Month. This month's kit is filled with so many goodies that inspiration and creativity will be falling off your projects! Kits are available now in the store and its first come, first serve. There are no lists or signs ups, We believe that scrapping is a passion and not an obligation . Hurry and get yours today , tomorrow could be too late !


The favorite part of the Kit- the OTP ( Off the Page) and this month we are featuring a shadow box, manufactured by Darice.


BUT WAIT THERE IS MORE !!!
Do not forget about the add ons

Petaloo Vine, Prima Painted ladies, Prima Fairy Belle, Prestige Mini by Wrights, Petaloo Peony


Butterflies by Petaloo, ZVA Creative Crystal, Tattered Angels – Chalkboard Mist, Vine by Petaloo, Rub Ons Kaiser –Rustic Bird House, Hero Art Lace, MM Glitter Brads, Chipboard Alphas Mini Flowers by Wright


Kaiser – Secret Bird – Private, Fairy Belle- Marcelle, Bo Bunny – Garden Almanac garden Vines, garden Weathered Kaiser madame Butterfly – Camisole,Bodice, Blouse, petticoat, Kaiser Up Up and Away – Rollercoaster, Moon Ride , Kaiser Blae and Ivy – Field


Ming, Periphery Gold, Reflections, rosemary, latte, Tangerine, Scotch, Sugar and Spice, Whitewash, Palm Grove


And here are some examples from the Creative Team

And Samples from our AMAZING Guest Designer Gabi


OFF THE PAGE CREATIONS


You better get it fast!!! I will sale out quick!!!!! I totally loved this kit! It ROCKS!!!!
Store link Store Link


Saturday, June 2, 2012

**So Excited!! Guest Designer for June!!**

OH MY GOSH - Do we have a great surprise for all of you this month ... wanna know? We have brought Gabrielle over the border for the month of June as our Guest Designer! Yes we did !! Now, we all know anything she touches turns to a magic and what she has done with the Kit this month will blow your socks off .. but you will have to wait till the 3rd of June to see ..

I am still in awe that we have captured her ... and without further delay may I present the one and only Gabrielle Pollacco ... ( PS do not forget to congratulate her on her first scrapbook cover - what an accomplishment!

My name is Gabrielle Pollacco, I live in Cambridge, Ontario (Canada). I started scrapbooking about 7 years ago and fell in love with this art form from the very first page I made. I love that this art form is ever changing and find myself constantly inspired by all the wonderful new products that come out each year. My favourite thing to scrap about is my family, my dear husband and my two girls, as well as my extended family.

I've had the honour to be on a number of wonderful design teams over the years, some of my past design teams being Daisy D's and Zva Creative and am presently on the Bo Bunny, Webster's Pages, Dusty Attic, The Color Room and Scrap 365 Magazine (UK Magazine). I've had my work published in Memory Makers Magazine, Creating Keepsakes Magazine and Scrapbooking & Beyond Magazine as well as a number of online magazines. I worked for a Tradeshow Design company as a project manager before I had my babies and now that I'm a stay at home mom I'm fortunate enough to have a little time to enjoy this amazing hobby.
I'm delighted to have been asked to be a Guest Designer for Flying Unicorn and join in with the talented group of designers here for this month!
Gabi xx


Just a few of her amazing creations :


In the meantime , Click over and I mean click over NOW if you are not a follower of her blog for some jaw dropping eye candy !