Supplies needed:
I used my Cricut to cut out the daisy flower. I did a tute on the big flower that matches. There are other flowers out there that have 7 petals needed to make this flower.
Birch leaf punch, Star shaped flower punch ( I don't know the name of it but it is by paperablities)
Stems, Floral tape ( I used brown in tute but there are also other colors available)
CS, Ink for edge inking, mists I used the one pictured and some lindy's for the leaves and flower cap.
Wooden stick, glue (quick drying), Paper piercer, needle (one with a head on it).
Cutting and punching and coloring
Cut out 15 1 inch daisy flowers, 3 punched star shaped flower, 10 leaves.
Color your daisy flowers by inking edges and misting. Note you will need to do the folding part right after you mist. They need to be damp not wet when you fold them. Shape leaves with your thumb nail by creasing with the design of the leaf. then mist them as well. The mist helps highlight the creasing. Also color the star shape flower the same color as the leaves. Pierce the center of the star shape one and kinda mold around your shaping tool. Here are the pics of my colored leaves and flowers.
Assembly of the flower:
You will need 4 for the petals and 1 for base. Fold in half and side to side, the back should be in the shape of a heart. Then glue the 4 pieces around where point of the petal faces middle (Note pieces need to be dry to glue them down). Do not glue center. After pieces have been glued and the glue is dry you are ready to pierce the hole. Take 2 floral sprays and cross them and fold in half, then twist them tight to run through the pierced hole. I used a needle to help me get the spray through the hole. Here are pics of this process.
Now you are ready to take the center and attach to stem. Twist around the stem and place a small amount of glue to hold it in place this adds extra stability to the flower. See pics.
Here are some photos of the stem lengths. I just eye it really. You need one longer than the others. The longest one will be the top part of your vine. I do the same on the leaves. They however don't need to be as long as the flowers. Once you do the step up above then let them dry and glue the leaves to the stem. Note glue the stem to the back part of the stem. I got in a hurry and did it backwards. All well it turned out ok anyways. Here are the photos..
The extra stems laying below the leaves are for the swirlies. Here is pics of how I made them. You basically just wrap them around your wooden stick leaving a little unshaped so you can attach to the vine. stretch them out a bit,not to tight of a swirl. Here are those photos.
Vine assembly:
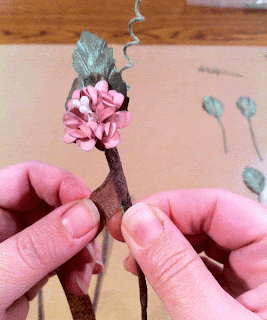
I didn't show the gluing of the leaves to the stem, thought that is a pretty easy step. After the glue is dry on the flowers and stems and leaves and stems you are ready to start the wrapping process. Take your floral tape and wrap around the flower and stem. Starting at the top and holding in place as you wrap the tape downward and pulling at the same time. The pulling on the tape makes it sticky and releases the glue. Once you have wrapped your flower then add your cap. Next add 2 leaves to 2 of the flowers and one on the last one left. Hold the leaves in place with the tape ready to make your first wrap around them. Again pulling down at the same time. Go down the length of the leaves stem. No need to go all the way down the stem again. Here is the pics of this step.
Continue to wrap all the way down on this step. Then add your cap. Here is the pics for that..
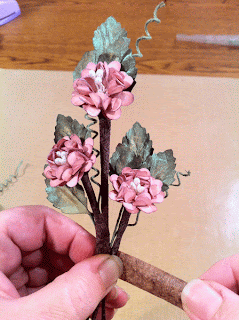
Now add your leaves as stated up above.. Here is the pics of that process..
Just wrap to the end of the stem on the leaves.. Do all 3 flowers this way.. Here is what they should look like..
I know this is very long but hope you find it worth it! Hope you enjoy!!


Beautiful! You are a wait for taking the time to make a tutorial! I don't know if I am even patient enough to make one!
ReplyDelete