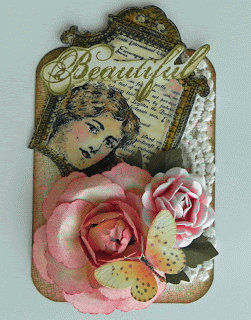
Hey everyone, sorry it has been so long since my last post. I know such a slacker right! I was even on Vacation last week!! I meant to do a lot last week but got few things done. I did do a tute on the Peony that I used in my last and current LO that I am putting on here for you. I also got a LO to share with you. So this will be a extremely long post!! Sorry that I have seem to of late do this I will try to do better promise! TIME JUST GETS AWAY FROM ME! LOL Ok enough of begging for forgiveness on with the tute!!
Supplies needed:
Cricut- to cut out the apple shapes (you will need 12)
Punches- either circle punch or snowflake. I am using the snowflake. (this is for the base for the petals) Sun punch (for centers)
Pad- for shaping
Shaping tool (I use a ink pen and a basic grey rub-on tool) I don't have a set of sylists so I have to be creative in this area LOL.
Wooden stick I use to shape with as well (this is for shaping petals)
Sizzors, tweezers and quick drying glue (I use liquid glass CTMH product)
Coloring your petals you can use chalk,ink,mists or sprays. I really is up to you. I used in this tute ink.
Step 1
Cut out 12 roly poly apple shapes from the plantin cartridge. The size I used is 11/2".
Step 2
Cut off the leaf and stem on all 12 and color how you like. Let dry if wet.
Step 3
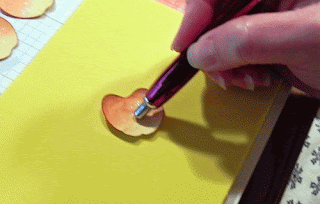
Shape your petals. Use foam pad and what tool you have to shape with. You want to go around in circles in center and work out to sides causing the petals to crinkle on the edges.
Then use tweezers in center pressing sides at the bottom of petal to form a crinkle in the center of the petal.
Then use rolling tool (my wooden stick) to curl top part of petal back. Do this to all 12 petals. Note: you will us your fingers some to help with the shaping process.
Step 4
Punch out 2 snowflakes or circles for the Base. Use Pen or shaping tool to rub in center to get it to bow the sides up to attach petals to. Do this on both pieces.
Step 5
Attach petals to base. Glue bottom base petals out farther than the top base petals. You may need to glue top base petals to each other, slightly over lapping a little, down the sides close to the bottom, near the center. To help with the shaping process ( help them perk up a little). You can use a pop dot to attach the bottom base and top base together or just glue.
Step 6
Making center, punch out 4 suns. 1st sun cut between each ray. Then each sun move a little closer to the center (make sure don't go all the way) the closer you cut the more it will stand up. Then use pen to shape by making it stand up, slight circle motion makes it stand up. Do this to all pieces. Last 2 suns cup tighter with your fingers. Then glue inside stacking them into one another. Kinda push prongs in to help close in the center.
Step 7
Now attach the center to the middle of your base that you have stacked together. To complete your flower.
Note: Don't be afraid to experament with different sizes of petels. I cut out a bunch to play with and made another flower that I used in the following LO. Also the little leaves I used to make a additional flower in the LO as well. Have fun with it that is what it is all about!! LOL
Now for the LO that I have done using the "Grandma's Garden" kit from swirlydoos. This kit was perfect for the pictures that I wanted to scrap of my mom. She also helped make some of the flowers that I used in this LO which makes this LO even more special.
This is the whole LO. I used some super awesome stamps that I got from swirlydoos called Lablanche stamps. The image of the ladies face is one (on the left side) and then the image of the grandfather clock and flowers (on the right). I used my CTMH blending pen and ink pads to color them with. Sooo fun! I have never gotten giddy before using stamps but this time I really did!! LOL Ok now for some close ups of each side.

Left side has pictures of my mom one is the only school picture that she has of herself when she was in 2nd grade. The other picture is of her on her wedding day. She was only 16 when she married my dad! They are still married today and have been married for 38yrs!! Now my daughter is that age and there is no way I would let her get married!! My daughter has just bearly started dating.. Still that is something that is driving me nuts a little! LOL I got a fab Dusty Attic piece which is the birdcage that you see. I painted it white. Then used the stamp that came in the kit that was cracked paint look. It gave the bird cage a little aged look. I also used a little bit of distressing ink to help make it not look so bright white. Big Red flower is made by using different sizes of the apple from the above tute. The little red flower peeking out from under the Peony is made by using the little left over leaves from the apple. Ok next side!!

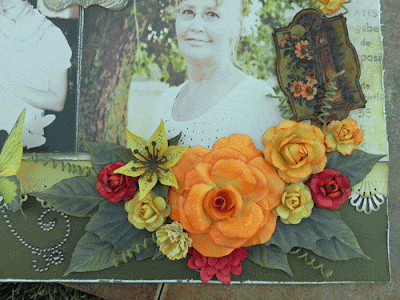
The Title is "Garden of Memories" I chose this title well because mom does have a garden of memories since she was in 1st grade LOL!! The Picture of her holding the baby which is me BTW she was only 17!! The Picture beside that one is one that I took on the 4th of July 2009. The other little picture that is out for debate on how old and when.. But it is one of my mom's faves of herself so had to use!! She made the bigger flower!! So pretty isn't it! She also made the small red roses and small yellow ones as well as the medium yellow orangish ones and the small yellow orangish ones.. This kit also had in it a sketch done by the awesome Beggahuna!! I like taking her sketches and making them double LO's. I entered the LO in the sketch challange that they have with each kit. I know that I don't even hold a chance with winning the challange because the gals over at swirlydoos is in a total league of thier own!! They are all so so awesome!! Just check out the
Gallery over at swirlydoos and you will see what I mean.. I don't hold a chance! But what the heck it was super fun doing it!! Ok ready for some super close-ups?
Now I used Lisa G's
leaves and
Butterflies that she puts in the forum for use to use.. She is so awesome she makes a new file of butterflies for each new kit!! This kit also came with some Glitz sheets in it (the paper with the music notes and butterflies on it.
This is a close-up of the Leblanche stamp I was telling ya about!! I used several coats of embossing (clear) over it after I colored it and then bent it back and forth to crack it some. These stamps are super detailed and super super easy to use and clean even with archival black ink!!
I used CTMH chipboard letters for the "Garden" stamped with a Lablanche stamp that was just wording. Used Versa mark and clear embossing powder while the letters was still white then colored with ink fading one color on top of the other. The chipboard piece with the word "Memories" stamped on it is out of the "you and me" kit from CTMH. The border punches used was Mrs Martha's yeah you all know her well I bet LOL!!
Here is another close-up of the Lablanche piece (clock and flowers) and my moms flowers. Oh yeah and I used some Prima bling that I cut up and used through out the LO.
Well that is all for now.. This would have been on here last night if the electric didn't go off and stay off till 11:00!! Just saying thats all.. LOL See ya next time!!


