Tuesday, January 31, 2012

**Sweet on Fabscraps**

 Hey everyone! Have a couple of projects to share with you today. This week at Flying Unicorn we are spotlighting one of my favorite companies! Fabscraps!! I am so loving there clever and delishes lines! They are sure to please those out there, who love shabby sheek.. I am discovering that I am one of those people.. So with that thought and the up coming holiday, I thought about a 3d project that I wanted to do.. I have been seeing these awesome projects done with a slice of cake.. So I set out on a web journey to find one that suited my needs and found one.. I found a box design on the Modern wedding  website. I will put the file for this delishes design in our file section of the Flying Unicorn. I did alter mine a bit to make it bigger, as the one that was downloaded was a bit to small for me.. I will put both my altered version and thier original one there so you can have your pic. I also used one of the first rose techniques that I learned on this piece too. You can find out how I made them by clicking this link. It was done By Tonya Dirk. Thanks Tonya for the awesome tute!! Now for my projects.
Both-card-and-box-f-w
I used Fabscraps on the box, roses and card. The PP that I used was "Shabby Chic", "Timeless Travel Filigree", "Timeless Travel Stamp". Love, Love these PP.
Other Products used was CTMH ink, stamp, cardstock, ribbon and shape for card was cut with my cricut. The Butterfly is one that I got from Lisa G., Small little roses both pink and green, also the other little flower and spray are all Sd's. How about some close ups?
Card-f-w
I shabbied up the card a bit to give a little romantic feel. But those delishes papers does the rest! lol
Ok how about some views of the box close up?!
Side-of-box-f-w
The white lace is Walmart.. Forgot to mention that.. I have found a few good laces there so I can't complain to much.. LOL.. Here is the back view..
Back-of-box-f-w
 So much fun to make! I might just have to do some more!! Don't forget you can find the files for these in the files section of the website.. Hope you enjoy and if you make one, load it in the gallery for us all to take a peek at your delishes creation!! Don't forget Fabscraps is available in the Flying Unicorn store! Take care and God Bless!

Monday, January 30, 2012

Friday, January 27, 2012

*Liebster Blog Award*

I found out this morning that I have recieved a blog award from a fellow blogger! How cool! A very sweet lady by the name of Michele gave this to me. You must check out her blog she has some awesome digi work going on! Click on her name and it will take you to her wonderful blog.

About the award: “Liebster” is a German word meaning dearest, beloved or favorite, and the Liebster Award is sort of a chain letter among bloggers that’s intended to showcase exceptional up-and-coming blogs (typically, those with 200 or fewer followers). There’s no evaluation committee or formal award process for the Liebster, but in a way it’s even nicer – it’s recognition that a peer has noticed and appreciated your hard work.

Here are the rules:• Choose 5 up and coming blogs of fewer than 200 followers to award the Liebster to.
• Show your thanks to the blogger who gave you the award by linking back to them.
• Post the award on your blog. Link back to the blogs you have given the Liebster to so everyone else can pay them a visit.

Now for my choices for the blogs that I can pass this torch on to.. There are many and I mean many talented artist out there. They provide inspiration to each of us, with the tutes and art work they have done. One of the highest compliments one can give, is to become a follow of thier blog.

Here are my choices:

Maggie http://scraptravelbark.blogspot.com/

Laura  http://angelbearscraps.blogspot.com/

Frank http://magicscrapbook.blogspot.com/

Beverly http://analteredspirit.blogspot.com/

Linda http://www.blueskyscrapping.blogspot.com/


These are my friends and people whom have incouraged me in one way or another. All very wonderful and very creative. I hope you enjoy visiting thier blogs!


Tuesday, January 24, 2012

Layouts, Dusty Attic and Scrap FX

Hey all! We are spotlighting some of my favorite things this week at the Flying Unicorn! Dusty Attic and Scrap FX Chippies!! YAY!! These are so very much fun to play with!! I have a few LO's to share with you.. This First LO is of my DD.. It is called "Unseen Walls".. She has a learning disablity and we have struggled many years with it. But with God's help we have made it this far! She will be a Senior next year and that is a huge accomplishment let me tell ya! I took this picture and have always wanted to scrap it but never could find the pp that I wanted to use. We got some awesome pp from Flying Unicorn called Ruby Rocket Le Jardin. Let me tell ya this pp IS AWESOME!! Ok now let me stop blabbing for a sec to show ya what I mean..LOL
All the pp are From this collection.. They are so beautiful! I used Prima Vine and The blue blooms are Prima and the big brownish flower is also. The small blue roses are Kaisercraft. Walmart doily treated with some Lindy's moonshadow mist. Lisa G's Butterflies.. CTMH cork lettering and Tattered angels brick stamp. That beautiful DA piece with some of the Ruby ROcket trimmings and Flying Unicorn little bitty roses called Playful secrets.. Let me get ya a close up of the DA Piece..
I used white paint, Shimmerz paint and some puffy paint to acheive the effect shown.. More details on this at the Flying Unicorn Today page.. Just click on the Link to the right and it will take you there..
One more close up and I will show you another LO..
This was a super fun LO to do!! Ok have another LO to show ya using DA and Scrap FX..
This LO is of one of my BFF's and my DD.. We did a photo shoot at the end of summer and this is one of those pics.. I used Ruby Rocket PP on these as well the Le Jardin collection.. We have these PP available at the Flying Unicorn store.. Ya gotta give these a try! I also used some Prima little blue flowers and one of my own the sunflower that I did a tute on a long time ago.. The yellow ones are Scrap FX "funky Flowers" that I used one of our CT memebers water technique. You soak them for a few secs in water then gently pull them apart. I used white paint and some CTMH ink and some Lindy's to bring the colors to life.. Let me get you some close ups of this as well..
Pretty cool! It was fun to create with them.. I also used some CTMH Hemp, Cardstock and some more of Lisa G's cool Butterflies.. Martha punch that just went hand and hand with the DA piece that I used.. Let me show you a close up of that too!
On the DA piece I painted it lightly with some white paint. Then stamped with a crackle stamp from Tattered Angels.. The lettering and black swirls are EK success.. I think I have one more close up of this LO..
Yep this is the Sunflower that I made.. I know its not in its traditional colors, but think that it went well with this LO.. I have one last LO to show ya for tonight..

I did this for the RR Challenge at Flying Unicorn that Maggi is hosting.. This has been lots of fun! We are all having a blast.. This is a LO of my DGM.. I love her to death!
 This LO also has a DA piece in it that I colored with ink then applied some TH Rock candy Crackle to it.. Oh and did I mention that you can use them even farther as masks like the gate in the background! Yep many, many things you can do with these highly detailed Chippies!! I used Riddlersholm PP and Glitz. All the flowers used are Prima and the ribbon, as well as the swirly bling. With the exception of my vines and the branches at the top. The branches was cut out using my cricut. I sadly was unable to do the live tute on my vines at the crop this weekend at the Flying Unicorn. I had a death in the family. We lost my FIL last sunday suddenly. I haven't forgot the promise to do the tute on it and as soon as my life calms down, I will get it done.. Don't forget that most of the things that I have shown you here can be found at the Flying Unicorn store.. Good night all and God bless!

Friday, January 13, 2012

Lindy’s Angelic Sweetheart Flower

Supplies needed

Quick drying glue, Ink, Mica powder or mist of any kind, white cardstock, sponge, scissors, Floral sprays and piercing tool (not pictured).

Sizes of Flowers and amount needed of each is 2 ½ (x5) and 1 ½ (x1)

I used my Cricut to cut the flowers out. The cartridge I used is “Art Philosophy”. There are other cartridges out there with a similar flower that I used. It is a 7 petal daisy like flower. Some of the alternate cartridges are “Georges” and “Basic Shapes”. Here is an example of what you are looking for.

1st step Inking edges
I use a sponge like picture shown to ink all edges front and back of all flowers. Make sure that it’s (ink) a little deeper color than the mica or mist that you are using. Same color family though.


2nd Inking step

Pounce color lightly in the other areas fronts and backs. Do this on all flower pieces. Like picture shown.
All should be ready to add the micas or mists.

3rd Step adding your micas or mists and folds
 
Get 4 of the larger flowers to fold. The ones not used will be the base and center. You will fold each piece after you apply the mica while damp (this will lock the folds in place). Paint on your mica as shown.

Fold as follows:

Fold in half were 3 petals are on top of 4. Should look like this.

Now fold left side in like shown.

Now fold in right side as shown.
The back should look like a heart like shown.

On the fold side bend petals forward and kind of squeeze top of petals a bit to shape. Do this on all petals except back 2 go the opposite direction with them. It should look like picture when done. Do this on last 3 flower shapes. There should be a total of 4 when you are done.

When you are done with this step color your base and center. Here is what you should have and look like so far.

4th step Center
This is the smallest flower. It should be mica or misted. Gently curl all petals in toward the center. Should look like picture.

Let this dry completely. Then poke hole in center and run floral spray though whole. Should look like picture.


Then clip off excess. Leave a little nub for glue and apply glue to the nub. Then let dry.

5th step Assembly of Main Flower

Add glue to center of base. Then arrange each piece were all points are in the center.

6th Step Adding Center
Your center should be dry. Add glue to center of flower piece and add center.
You’re done! Let dry and have fun making more!
Note: On smaller ones I use individual sprays. Take 2 fold in half twist ends and then poke through hole.
On the naming of my flowers I usually name them after what I have used and who has inspired me. Hope you all enjoy! I will be doing my vine tute live at Flying Unicorn for the" Polar Bear and PJ" online crop. Please stop by and check things out! Its gonna be a blast! Starts Friday Jan 20th and ends on Sunday 22nd at 6 EST. Games prizes all kinds of cool things! Hope to see ya there!

Wednesday, January 11, 2012

**G45 LO's**

 Hello, everyone!! At Flying Unicorn we are spotlighting G45 this week!

 I would like to share a few LO's that I have done with G45 this week. First, I would like to say G45 papers are so very versatile. With ease I was able to match papers from different lines to match the LO that I was working on. I have 3 examples to show you this. 

 First LO is done using G45 "Playtimes Past Collection" (background) and "Botanicabella Collection" (forground). I also used some Petaloo Color me crazy orchids.

Here are some close ups of the blooms!


 I think they are a perfect match to my photo's that was taken at Disney.

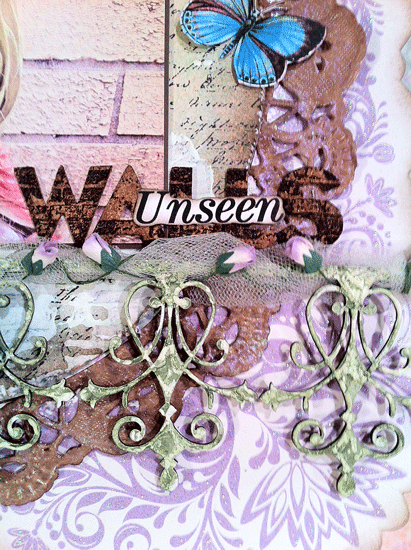
 On this next LO I used G45 "Le Romatique Collection" fussy cutting the roses to go with this LO was perfect and "Once upon a Springtime Collection". I also used Dusty Attic cupid that I altered and the corners. The small blue blooms are Prima. The small off white is  SD's. The Large ones was hand made by my mom. I also used a cricut design for the heart. The Pearl swirls are Zva. Ribbon is some from my stash.
Here are some close ups of this LO. Just loved playing with those DA pieces!

Now for a close up of my Mom's blooms!

 This is of me and my sweetie on our wedding day.


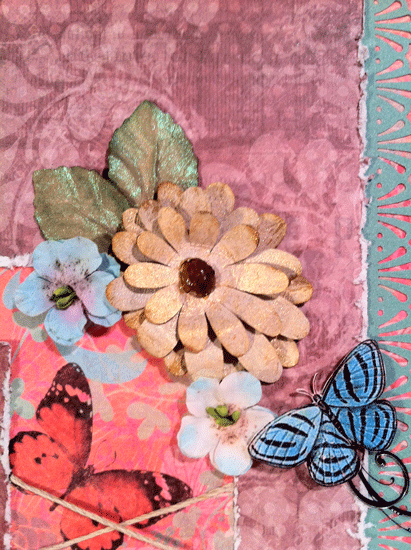
 The Last one is my kids favorite. I didn't use different collections together with this one. The whole collection was perfect for this LO. The Collection that I used is "Tropical Travelogue Collection". I used some Prima botanical mix for the blooms (they are all white and in pieces) I colored and built them to make the flowers. The Large design around the photo was cut using my Cricut. The small black swirls is EK success as well as the title for all the LO's. All butterflies are from a good friend Lisa G.. This was a extremely fun LO to make. All the goodies that match this collection, a person could get lost for hours (and I did LOL!). I also used one of the PP to fussy cut out the leaves around my blooms.
Some close ups of this one too!
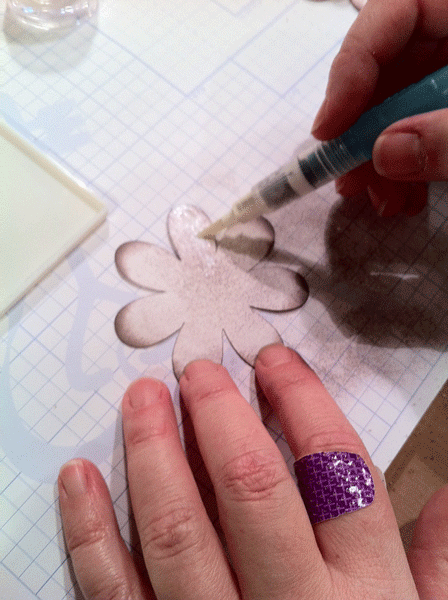
The Prima botanical mix was so fun to color and make these lovely blooms!

The G45 images are sooo very pretty and detailed!

Last close up of the beautiful sunset..

 This is a sunset that was taken on our vacation back in '08. That is way to long to stay away from the beach!! I hope you enjoyed, and come on in a take a peek at the store. All PP are availble as well as most of the products mentioned.  Take care and God Bless!

Monday, January 2, 2012

MOJO Monday with Flying Unicorn! Sketch and LO

Well it's Monday and I'm off work! Haha That is the only time Monday is good.. LOL Unless your playing along with our MOJO Monday sketch that is! This week I am the one not only doing the LO for the sketch, I have actually done the sketch!! This is only the 3rd one that I have ever done.. Gonna be doing more so stay tuned!! Here is the Sketch..
and here is my LO..
 I used Authentique PP for this LO. We have Authentique in our flying Unicorn store. I love the fun and vibrant colors to this PP. Also a note about this PP. It is heavy weight, like cardstock. It inks and distresses extremely well! I used a October Afternoon rub-on to create my title. These are also available in the Flying Unicorn store. I truly, truly love these rub-on transfers!!! They are the best that I have worked with yet!! They come off of the carrier sheet with ease and they don’t flake or come apart, like some that I have used in the past. Of coarse I also had to add a little swirly action with some ZVA pearl swirls. These are also available in our Flying Unicorn store. Dusty attic pieces used was Birds on a branch and circles.. We carry Dusty Attic in the store as well! I took these and coated with gesso, inked and then added some Tim Holtz crackle paint to it. The flowers are Prima and Sd's.. The resin bird and nest are also Prima. The doily is walley world.. How about a few close-ups?..


I Just love flowers in my LO's.. Next close-up..


I had fun playing with this DA piece, ink and TH crackle paint. I so love the effect!! Next close-up..

The little nest and bird went together like peas and carrots with this LO. To sweet!! Last Close-up..


This was a Perfect day.. We had fun taking photos at the park! October Afternoon rub-ons are so fun, I have found a rub-on that I actually love!

 Fun, fun LO to do! Have fun with the sketch, this happens to be one that I created. The 3rd of many to come! Please don’t forget to load your awesome LO into our gallery so we can admire your beautiful work! Have a wonderful week of creating!!