
Sunday, December 30, 2012


Monday, December 17, 2012
"Christmas fun with Flying Unicorn"
Hello everyone! Here today to share somethings that I made using Pinkpaislee "City Sidewalk" Collection!
The First up is a tag.. Let me say if you are new with making tags and would like to do so, well this collection is perfect!! It has its own matching tags in a assortment of sizes for you to play with!! you most defiantly want to get the matching ephemera die cuts as well!! You can find these in the Flying Unicorn store!! And here is the one I made with this awesome collection!


Now cut a strip 12 inches long by the height of your stack. That way you make sure it is tall enough for your coasters. I just eyed it.. Here is a pic of that..
 Now glue the strip to your base. Going all the way around and making sure your strip stays upright and not crooked.. Take your time and if the strip is to long. Over lap it just a little then cut off and glue the rest of the way down.. You should have a Base piece that your coasters fit into..
Now to make the top piece, Trace around your base leaving the coasters in.. This will make your top piece just slightly bigger than your base for it to fit over your base. On the top parts strip punch the whole piece and this will give you a little decoration all the way around your box. Glue it in place and decorate the top! Here is a pic of the side of my top..


I used a Kaisercraft wooden ornament that I covered with some Stampendous embossing enamel. I used the aged Silver here. A piece of the City side walk PP is under the Ornament and 2 more pieces down too.. You can see this little girls under the ornament.. I used the ornament as a window! I thought it was cool.. lol I also used some Teresa Collins trims for the bow and the edging, and TC pearl at the center of the ornament too! Petaloo flowers for that little something extra! :) Anything in bold print is a link to the store where you can find that item! I hope you find that the box is really easy to make and the coasters are too! Give them a whirl and have fun! They make awesome gifts!! Hope you have a great day and until next time Hugs!
The First up is a tag.. Let me say if you are new with making tags and would like to do so, well this collection is perfect!! It has its own matching tags in a assortment of sizes for you to play with!! you most defiantly want to get the matching ephemera die cuts as well!! You can find these in the Flying Unicorn store!! And here is the one I made with this awesome collection!

Oh the vintage flare is so wonderful with this collection!!
The next thing that I made also includes the cork that came in our Dec KOM. I decided to make coasters with the cork and use a sheet that is in the collection as a backing.. I also used a couple of my fave stamps to adorn the top of each coaster!! The box has a funny story.. I was going to in the beginning make a square box.. That stood up right.. I was sick and enlisted my DH help with it.. Well that totally didn't work at all!! The base ended up being to small for the top.. It was really and I mean really LARGE.. LOL all well it was fun getting DH in on the action of helping me with a project!! So I sat and decided to go with a round box.. It was very easy to make and thought why didn't I think of this earlier!! SO much time wasted!!
I first made the coasters by using one that I already had as a pattern of the size I wanted.. And traced out 4 pieces of the cork for each of us to have our own.. I also cut out 4 pieces or circles out of the PP I wanted to use. It is called "Special Delievery" From the Pinkpaislee "City Sidewalk" Collection. Then I used Inkssentials Glue and seal that I found from the Flying Unicorn store. It is a matte finish. Click on the name and it will take you to the store where you can find it! I used the sealer for the backing as a seal and a glue for each piece.. Coat the cork on the rougher side, then add your pp and then glue it again.. So now its sealed and you won't hurt it when it gets wet from the drink! I also decorated the top part of each Coaster with a Leblanche stamp, I used Staz-on in black, stamped it and then colored some of the areas with green metallic paint. Note: on the paint you wanna use something that will not come off when wet! Here is what I came up with on the Box and Coasters!

How did I make the box?! Very easy!!
First trace your coaster on a piece of CS ( make sure it has some weight to it to!) Then cut out around it leaving about a 1/2 inch space between your drawing and the outside edge. Then Cut slits going down to the outline all the way around.. I scored my outline lightly so it makes the folding easier.. Then fold the slits in and then make sure you have a in and out effect with the slits.. This makes them easier to shape for the edge to be glued in place. Here is a pic to give you a idea..


Now to make the top piece, Trace around your base leaving the coasters in.. This will make your top piece just slightly bigger than your base for it to fit over your base. On the top parts strip punch the whole piece and this will give you a little decoration all the way around your box. Glue it in place and decorate the top! Here is a pic of the side of my top..

Here you can barely see my CS under my strip.. I did use the City Side Walk PP instead of the CS for this strip only.. It was a good weight paper and held up very well.. Then I adored my top!

I used a Kaisercraft wooden ornament that I covered with some Stampendous embossing enamel. I used the aged Silver here. A piece of the City side walk PP is under the Ornament and 2 more pieces down too.. You can see this little girls under the ornament.. I used the ornament as a window! I thought it was cool.. lol I also used some Teresa Collins trims for the bow and the edging, and TC pearl at the center of the ornament too! Petaloo flowers for that little something extra! :) Anything in bold print is a link to the store where you can find that item! I hope you find that the box is really easy to make and the coasters are too! Give them a whirl and have fun! They make awesome gifts!! Hope you have a great day and until next time Hugs!
Friday, December 7, 2012
"Lo's and More with the Dec KOM Flying Unicorn"
Hello everyone! Here to share with you today some of my projects with Dec KOM. I really enjoyed every moment of creativity with this kit. From the papers to all the flowers and embellies! Plus the awesome OTP that Alda puts in the kit to give it that special flare!! Ok up first is the LO's I would like to share with you..
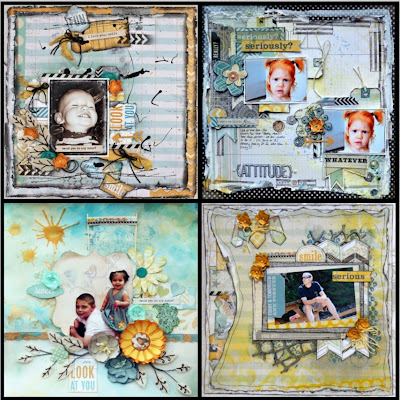
 On this LO I used the cool circle elements from Pink Paislee.. You can color these with inks on mine, I used Smooch Spritz "Navy Twinkle" that I have had in my stash for a very long time.. The color matched really well with the Beautiful Fab scrap papers from the Kit I was using.. Those gorgeous blooms are in the kit as well. From Fabscraps you can make your own romantic roses! How is that for cool?! I did add some Petaloo "Velvet Hydrangeas" in Dark Blue to it, but no worries you can find them in the Flying Unicorn store! I really love those flowers and you get a lot of bang for your buck! They come in several different colors too!! Here are some close ups of this LO..
 Here is a close up of the cool details on the Fabscraps PP that Came in the kit.. I took each piece and used the detail in the print to highlight with my circles! The cool crown and Crown ribbon also come in the kit as well! Next close up..

The Ruby Rocket PP was cool too! I couldn't resist the urge to color the flowers or a few with the cool paints we got back in June with the June KOM.. I just wanted a few to stand out, because I liked the black and white effect this pp had and didn't wanna loose that! The brightly colored butter fly is out of my stash and it is G45 on that I had fussy cut out and didn't use.. So don't through away pieces you can use them for later!! The paints are still available in the store here is a link to that. Ok next LO..
 I lifted this LO from one that Shona had done and posted on FB.. Saw it and fell in Love with the design and knew I had to lift it!! She said yes and I did! LOL I used some more of the gorgeous Fabscrap PP Marie Antoinette collection.. Yummy embellies such as the Scrap FX crowns and the Prima resin pieces. Oh and we can't forget about the flowers.. This one has Manor House (pick/purple) Kaisercraft roses mini (Blue) and Prima roses (cream). I fussy cut the wings out of the back layer of the Ruby Rocket "Mother Nature" and the tag is also in this kit and is also Ruby Rocket.. SO much fun!!!! Ok here is a couple of close ups of this LO..
 The crown (gold) dangling from the ribbon is on a strand in the Kit that I removed and added to the Bow.. Oops mist a flower.. LOL the White flower is from Prima the one below the crown.. I just love these folds so much fun and cool affects to the LO! Thank ya Shona for letting me lift one of your master pieces!! Next close up..
 Heehe Just had to get a close up of Marie!! Ok now on to my OTP!!
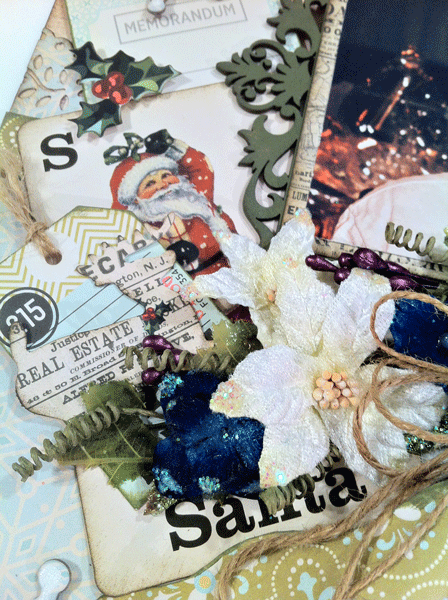
 This actually is a Christmas event organizer.. But since I don't organize anything for Christmas, thought it would work great to organize my Christmas stamps.. I have A LOT and for get what I do have!! On the cover I used some scraps that I had left over from the Teresa Collins "Christmas Cottage" collection, to cover it with and some of the other areas in this book too! Can't waste the scraps and this was a perfect way to use them! The bling is also from that same collection . Ummm.. I had to have it all with Teresa Collins, ya can't go wrong!! Wonderful PP, stickers and embellies!!!! Here is a link to the store with that collection! It works soooooo well with this project ya may want to pick up a few things too! Not that it needs it or anything, because this event organizer is LOADED with things to use!!!! The yummy little flowers are from Petaloo here is a link to that also! The Santa image is a Lablanche stamp that I colored with inks (these are my all time fave stamps!) and the above mentioned paints, I also highlighted the Santa in select areas with Glossy Accents to give it a little demention and a dash of TH distress inks in walnut around all the edges! Click on each name to get you to those places in the store if you want to check them out! The big bow is from my stash.. I always save these at Christmas time (blame it on Grandma! LOL) Here are some peeks in side of this book..

I just stamped in Stazon in black or red and green.. I didn't color any of the images.. For a couple of reasons.. Time, to match the book and because all I really needed was to see the stamp to know what I had at a glance.. I used the other things that came with the project just as accents to it.. Just decoration.. To keep it simple and fun! Here are a couple more pages various stamps that I own.. My 2 faves are the Lablanche ones!! Ok here ya go for some more pages..


 I hope this gives you some ideas to do with your OTP project! Hope you all have a great day!!! Oh and sorry for the long post!!! LOL :)


The Ruby Rocket PP was cool too! I couldn't resist the urge to color the flowers or a few with the cool paints we got back in June with the June KOM.. I just wanted a few to stand out, because I liked the black and white effect this pp had and didn't wanna loose that! The brightly colored butter fly is out of my stash and it is G45 on that I had fussy cut out and didn't use.. So don't through away pieces you can use them for later!! The paints are still available in the store here is a link to that. Ok next LO..


I just stamped in Stazon in black or red and green.. I didn't color any of the images.. For a couple of reasons.. Time, to match the book and because all I really needed was to see the stamp to know what I had at a glance.. I used the other things that came with the project just as accents to it.. Just decoration.. To keep it simple and fun! Here are a couple more pages various stamps that I own.. My 2 faves are the Lablanche ones!! Ok here ya go for some more pages..


Monday, December 3, 2012
** A special Challenge from me to you**
Hey all! I have something special to share with you today!! Other than the most gorgeous kit in the world that is!! Yes I do have a LO to share with you as well!!
I really don't know where to start or begin with this post. This is a post that is really personal. I normally don't do much on personal posts and like to just keep things lite hearted and fun.. Today is a very special persons Birthday.. He is no longer with us and I miss him dearly. We all do in the family... It doesn't seem right that he is no longer with us. This special person was my FIL, we lost him earlier this year to a heart attack. For me Bud was a real life Santa.. He looked the part and carried out the part every day of the year not just on one special day. He was always helping people out and was the worlds greatest Philosopher!! He had words of wisdom for everything.. Once there was a trucker broke down on Christmas and would not have other wise been able to make it home to see his family. Bud wouldn't hear of it so he went and got him and took him home. Families that were in need of a bed or food, they got it without missing a beat.. So many, many great deeds and never wanted anything in return.. If you looked up the words "Random Acts Of Kindness" in the dictionary you should see his name there. For he lived this everyday of his life..
I got a text the other day from his sister and read as follows...
"We cannot make Bud Henderson's birthday a national holiday. We can make his birthday a special day that seems very appropriate to honor him and his life. We are asking EVERY family member (even little ones) to PLEASE do a RANDOM ACT OF KINDNESS on Monday, Dec 3rd. If possible 3 acts would be even better!! (Research acts of kindness ideas... these acts do not have to cost you money.) Please forward this request to your immediate family and friends, Thank you.
Love you, Tonya"
My scrapping friends are my family and have always been.. So I am issuing this challenge to you as well! Together we can honor a very special person and do something wonderful for another person..
Here is the LO that I did of him for my challenge this month at Flying Unicorn.. This photo was one that I was gonna do last Christmas before he past.. I just couldn't make things work right with it so I past it on and did something else.. Little did I know he wouldn't be with us this Christmas..


I hope you will play along with this family challenge with me.. He was a very special person to us all.. Let his light shine on this special day all over the world!! Thank you very much and God Bless you all!!!
I really don't know where to start or begin with this post. This is a post that is really personal. I normally don't do much on personal posts and like to just keep things lite hearted and fun.. Today is a very special persons Birthday.. He is no longer with us and I miss him dearly. We all do in the family... It doesn't seem right that he is no longer with us. This special person was my FIL, we lost him earlier this year to a heart attack. For me Bud was a real life Santa.. He looked the part and carried out the part every day of the year not just on one special day. He was always helping people out and was the worlds greatest Philosopher!! He had words of wisdom for everything.. Once there was a trucker broke down on Christmas and would not have other wise been able to make it home to see his family. Bud wouldn't hear of it so he went and got him and took him home. Families that were in need of a bed or food, they got it without missing a beat.. So many, many great deeds and never wanted anything in return.. If you looked up the words "Random Acts Of Kindness" in the dictionary you should see his name there. For he lived this everyday of his life..
I got a text the other day from his sister and read as follows...
"We cannot make Bud Henderson's birthday a national holiday. We can make his birthday a special day that seems very appropriate to honor him and his life. We are asking EVERY family member (even little ones) to PLEASE do a RANDOM ACT OF KINDNESS on Monday, Dec 3rd. If possible 3 acts would be even better!! (Research acts of kindness ideas... these acts do not have to cost you money.) Please forward this request to your immediate family and friends, Thank you.
Love you, Tonya"
My scrapping friends are my family and have always been.. So I am issuing this challenge to you as well! Together we can honor a very special person and do something wonderful for another person..
Here is the LO that I did of him for my challenge this month at Flying Unicorn.. This photo was one that I was gonna do last Christmas before he past.. I just couldn't make things work right with it so I past it on and did something else.. Little did I know he wouldn't be with us this Christmas..

I felt that this PP was perfect for that photo.. It is the Pinkpaislee "City Sidewalks" collection I used a lot from the collection not just the pp.. Petaloo vine and flowers, and Dusty Attic swirly Christmas tree, Decorative edges and Frames. Available in the Flying Unicorn Store. Here are some close ups of it..


*** KOM December Ode to Yeasteryear Flying Unicorn***


As 2012 comes to a close, we ponder with smiles and sometimes with tears the year gone by. We remember our time away whether a family vacation or in our thoughts and dreams.Photographs of that special occasion have captured a moment that will live forever in the heart and mind. Cherished moments, loved memories is why we bring to you today Ode to Yesteryear.

We could not let Christmas pas s us by and our off the page project that is included in this months Kit of the Month is The Teresa Collins Christmas Countdown Memory Mini Album.

Though the kit is filled with lots of inspirational goodies, we have put together add ons that compliment the main kit


Build a Page
This month we are so excited to share with you Kelly's BAP that will give you step by step instructions to create this incredible layout on December 4th 2012 on the forums !

You Tube Tutorial
In the main Kit of The Month we have enclosed as 12x12 Corkboard in order to get your creative mind thinking of the possibilities. We present you with an Inspiration Video Tutorial by Shona giving you step by step instructions on making this incredible Cork layout !

Subscribe to:
Posts (Atom)