Sunday, August 30, 2015

Flying Unicorn Your Passion Your Art Sept KOM


http://www.flyingunicornstore.com
Flying Unicorn transitions to Autumn - the time of year when all the goodness of Summer and Autumn come together for a prefect blend. Sept's "Your Passion Your Art" captures the essence of the fading Summer and the welcoming richness of a new season. Without further adieu we offer you our September - Your Passion. Your Art kit of the Month


http://www.flyingunicornstore.com/category_s/1522.htm
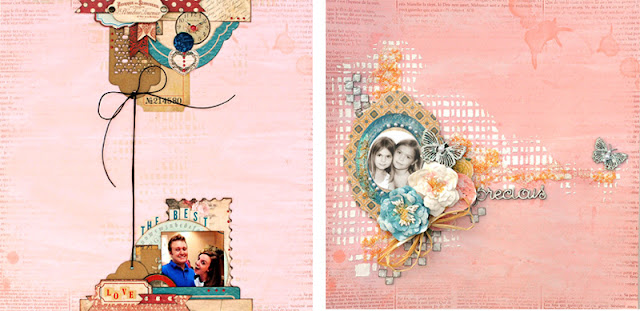
September is the month where folks grab the last whispers of Summer. It's a time to prepare for the changing season. Included in each Main Kit, is always a fun and unique "off the Page " item. We have the perfect "Off the Page" piece to help celebrate a symbol this change.


http://www.flyingunicornstore.com


From the beginner to the avid mixed media artist our Mixed Art add on kit will surely please you. Our Mixed Art kit will always come with a canvas and mixed media art supplies to advance your skills as an artist.


http://www.flyingunicornstore.com/category_s/1522.htm
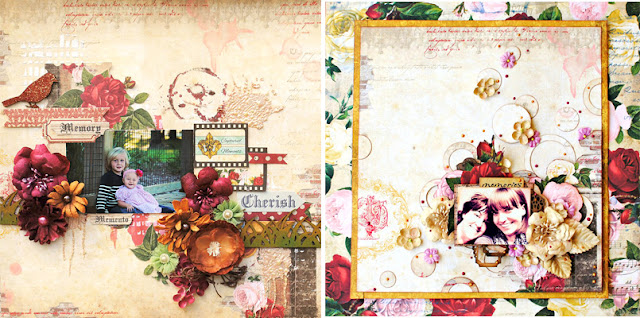
Flowers, vines,and embellishments oh my! Our Mixed Passion is a collection of everything pretty to add to the Main kit or the add on kits. The colors and embellishments will enhance your Kit of the Month creations or it can stand alone and you can create something magical on its own! So turn up the music, make some tea and lock your self away while you create some art!


http://www.flyingunicornstore.com
Our Small Art Big Passion is all about the love of making cards, tags atc's and anything in between. From Stamps, flowers, paper, embellishments and pretty things in between! These yummy goodies will enhance any of the kits or stand alone .


http://www.flyingunicornstore.com


We are thrilled to present great free tutorials, techniques, videos and Build a Page using our Kit of the Month to help you grow in the passion of your art. So stay tuned there is so much more to come in the next week!


Special Memories with CE

Hello all! Here today to share a LO with you using CE chippies. Love how chippies can add depth to a project. By using them in your layers it helps with dimension of those layers. Here is my LO.


By incorporating them in my cluster, added the depth I was looking for. Easy as pie to color! Just inkers in the selected colors of brown and green for the branch and Gesso and a brown inker for the shading on the birds. I used the Birds chippies and Branch Set of 3. Thrilled to see them in Sept KOM at Flying Unicorn!  Here are a couple of close ups!


Special memory of me and my wonderful husband! Love this man to bits!! The chippies mixed in with the cluster also helps the added framing of the photo. Without them the clusters would be a little on the boring side!


Chippies also are the perfect pair for media layers too! Gives a little more umph to those splats and molding paste areas.

CE Products Used:

Branch Set of 3

Birds

Other Products Used:

Flying Unicorn KOM Sept Featuring Bo Bunny

Thank you all for joining me today!!


Thursday, August 27, 2015

Playdate Thursday at Flying Unicorn!

Hi all! Welcome to Playdate Thursday at Flying Unicorn!

Tammy here today to share with you how I use my Faber Castell watercolor pencils to color my stamps. Today I am using my most fave stamps, the Tim Holtz " Crazy Birds" stamp set! These will be back in the Flying Unicorn store Really soon so stay tuned if you haven't got your hands on a set yet. Lets get this show on the road!


1st. I stamped my image on some watercolor paper. This holds up really well with the water you will have to apply. 


Now I am gonna show you 2 ways you can color these.. I have used both by themselves and it works just fine. But you can use them together. 

2nd. Grab a old lid spritz some water in it. Not a lot as you will just need to dip your pencil in it. Think of a old fashion ink well.. 


3rd I selected the beak to color using this step. Just wet and color the part in. Deep color and sooo rich! These pencils are smooth as silk to color with!


4th This part I chose to show you another way I color these stamps. Pick out a couple of colors.. I chose to use the Red and Yellow. I filled from the outside in. Center is where I colored using my yellow and the outside the red.. The water will blend them perfectly for you.. Kinda looks like a rough childs coloring at this part..


5th Use a water brush to smooth and blend the colors together..


6th The next step I used a paper towel and dabbed the center part a bit to tone down the colors and add in a bit more of effect..

Before paper towel..

After paper towel


7th You want to color the black parts too! These are cool shadow areas but they need color too! 


8th Now pull out a white gelly pen and add in a bit of highlights!


Yay he is already to cut out and use in your project! Here is a example of one that I did using a different bird. I also altered him! Only imagination is your limit on these little dandies! :)


Sooo Much fun Using these pencils and stamps!! Thank you for joining me today!!