Thursday, July 21, 2011

**Believe**

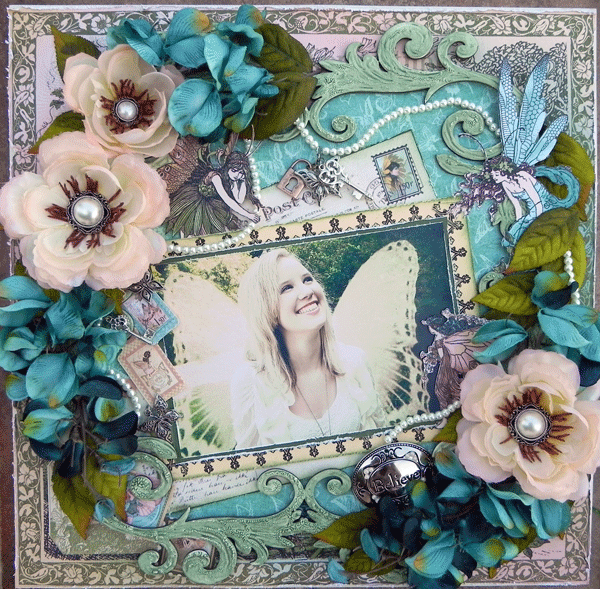
Hey everyone out in cyber world! Got another LO to share with ya.. This was another challange that I entered over at Swirlydoos called "Budget Blooms". The title says it all.. No Prima or Petaloo, just flowers bought out in a regular store or craft store like Hobby Lobby and such. Well it is great and all to save money and you do get quite a bang for your buck! But let me give you a tip when getting these types of flowers... DO NOT get the ones that is plastic covered with fleltish flocking!! They are a bear to glue down!!! I promise! Ok here is the one I did using the "Vintange Fae" Yes finally a Fairy LO for my DD and also gave her some wings!

Here are some Close-ups of it..
Fussy cut out the fairies and it also came with a bunch that was LO ready! Added some charms and pearls as well..
The frame is Dusty Attic that I applied puffy paint to and Shimmerz (Mossey Green) to and it really sparkles out in the sunlight!
The title is a piece that I found in the craft store looking for goodies for the other challange that I will be doing for Miss Joyce.. I think that it went well with the LO and theme! OK that is about it for today more to come.. Thanks for looking and God Bless!!

Monday, July 11, 2011

** Demure**

Hey guys!! Hot where your liven? Boy it sure is here!! Got a LO to share with ya used my Swirlydoos July kit with this one "Vintage Fae". I had all ideas geared toward doing a fairly LO.. Well this one took a life all to its own.. Ended up using different papers that came in the kit than the ones that I had in mind. Ended up switching pic than the one that I had in mind and even didn't go with the title that I had in mind!! Like I said this LO took a whole different turn.. One thing that did stay the same is the piece I did using the "House of 3" Parisian Anthology resist paper.. I fell in love with the bottom section of the sheet! It was such a pretty design and I had to use it. I also knew I wanted to use a folding technique that I had learned long ago that Anna Griffen tought on a scrapping show that use to come on.. But those were the only 2 things that remained of my original idea.. Well enough chitter chatter on with the LO!!


After I spread out all of the wonderful papers that I got with the kit, I saw that the Kaisercraft "English Rose" went well with the piece of the "House of 3" paper. I altered it with puffy paint to give it a stucko look.. I used for the back ground a sheet of Pink Paislee "Butterfly Wings" that I folded (Anna Griffen tech). I also painted a piece of Dusty Attic in the top left corner and applied the puffy paint to it as well.. Then I used some of  Lindy's micas to color with and CTMH inks.


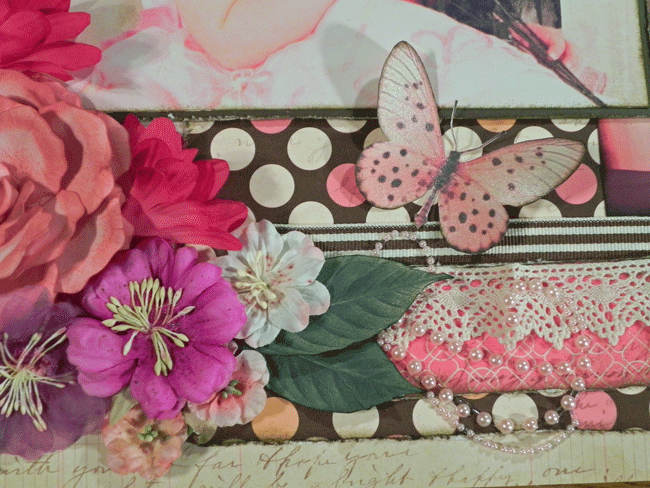
Here is a close up of the "Dusty Attic" piece that I used and the close up of the folding technique as well. I also used some pearls that came in the kit to give a little definition to the folds. The butterflies used was from Lisa G. she puts them up on the forum for us to use with our kits here.


Here is a closeup of the "House of 3" piece that I cut out and altered. Also close up the flower cluster. I used Prima (pink and mauve and leaves), Kaisercraft (blue) and the small roses is Swirlydoos..


Here is another shot of the bottom part of the cluster. Oh yeah I cut the swirls from Prima and placed them through out the LO.


The title well it was going to be "Grace" because in the picture it looks like my DD is praying. But that was a change as well. I thought to myself that she looked humble as well. So looked the word up and came up with the word "Demure" which according to dictionary.com means the same thing. It really seem to fit the whole French vibe I had going in this LO. The stickers that I used was from "colorbok".. I hope you enjoy and like it.. If ya do give me a shout out and leave me a comment! I love reading them! It lets me know that there is people looking and I aint just talking to myself LOL!!

Well hope to have more work to share in the coming weeks! Take Care and God Bless!


Monday, July 4, 2011

Fun Photo Shoot Day!!

 Hello everyone! I hope that everybody's 4th went well! Mine did.. I had a photo shoot with my DD that went great! She is a challange to photograph and most of the time I can only get a few pics that are good ones to edit and play with... Not today she did awesome and we had a fab Mom and Daughter time! Really had fun exploring places that I use to go to when I was young and were her Great Grand Parents house use to be... Our first stop to take pics was just a old gravel road that had a good shady area. Tried to find a old house place with some good texture to it but that was a no show. However the place were we got a lot of good pics was none the less that her very own Memaw Judy's. I edited all the pics with Florabella the action that I used on these was "Vintage Summer". I am hoping to use some of these photos with the new upcomming kit from Swirlydoos that should be in this week! Yay fun! Here is the result of our day together...

These 4 were taken at her Memaw's house.


These was taken on the old dusty gravel road.


Oh, I have a ton more but these happen to be some of my faves. I totally had fun playing around with Florabella on these. I gotta go for now but hopefully will be back soon to have a LO or two to share with you guys! Take care and God Bless!!


Saturday, July 2, 2011

**** Happy 4th of July ****

Happy 4th of July everyone! To those who are in Canada, Happy Canada Day!

Here is a LO and a ATC that I have done to kick of the holiday!


Peggy over at Swirlydoos has me loven making these little dandies.

Here is a LO that I did for a challage at Swirlydoos.

Hope you guys have a happy and safe holiday!!!

Sunday, June 19, 2011

Trying out the world of ATC's

Hello everyone!! Happy Father's Day to all the Dad's out there!!

Over at swirlydoos they have challanges, and this time I tried out the ATC one that Miss Peggy put up for us to do.. The only rule to them is thier size and it is 2 1/2 x 3 1/2.. Other than that the sky is the limit. The girls thier really have rocked this challange out! Check it out here. You will surely get some inspiration on these little cuties. Here is mine that I did.

This one is called Peaceful.

This one is called Beautiful.


These were hard for me to think so small. But they were still fun!!
Talk to you guys later!!


Wednesday, June 1, 2011

Trying To Get Caught Up

Hey everyone, sorry it has been so long since my last post. I know such a slacker right! I was even on Vacation last week!! I meant to do a lot last week but got few things done. I did do a tute on the Peony that I used in my last and current LO that I am putting on here for you. I also got a LO to share with you. So this will be a extremely long post!! Sorry that I have seem to of late do this I will try to do better promise! TIME JUST GETS AWAY FROM ME! LOL Ok enough of begging for forgiveness on with the tute!!

Supplies needed:
Cricut- to cut out the apple shapes (you will need 12)
Punches- either circle punch or snowflake. I am using the snowflake. (this is for the base for the petals) Sun punch (for centers)
Pad- for shaping 
Shaping tool (I use a ink pen and a basic grey rub-on tool) I don't have a set of sylists so I have to be creative in this area LOL.
Wooden stick I use to shape with as well (this is for shaping petals)
Sizzors, tweezers and quick drying glue (I use liquid glass CTMH product)
Coloring your petals you can use chalk,ink,mists or sprays. I really is up to you. I used in this tute ink.
Step 1
Cut out 12 roly poly apple shapes from the plantin cartridge. The size I used is 11/2".

Step 2
Cut off the leaf and stem on all 12 and color how you like. Let dry if wet.
Step 3
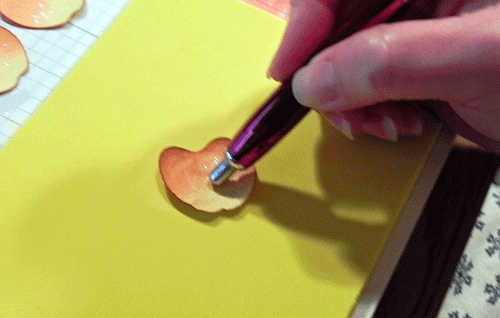
Shape your petals. Use foam pad and what tool you have to shape with. You want to go around in  circles in center and work out to sides causing the petals to crinkle on the edges.

Then use tweezers in center pressing sides at the bottom of petal to form a crinkle in the center of the petal.

Then use rolling tool (my wooden stick) to curl top part of petal back. Do this to all 12 petals. Note: you will us your fingers some to help with the shaping process.

Step 4
Punch out 2 snowflakes or circles for the Base. Use Pen or shaping tool to rub in center to get it to bow the sides up to attach petals to. Do this on both pieces.

Step 5
Attach petals to base. Glue bottom base petals out farther than the top base petals. You may need to glue top base petals to each other, slightly over lapping a little, down the sides close to the bottom, near the center. To help with the shaping process ( help them perk up a little). You can use a pop dot to attach the bottom base and top base together or just glue.

Step 6
Making center, punch out 4 suns. 1st sun cut between each ray. Then each sun move a little closer to the center (make sure don't go all the way) the closer you cut the more it will stand up. Then use pen to shape by making it stand up, slight circle motion makes it stand up. Do this to all pieces. Last 2 suns cup tighter with your fingers. Then glue inside stacking them into one another. Kinda push prongs in to help close in the center.
Step 7
Now attach the center to the middle of your base that you have stacked together. To complete your flower.
Note: Don't be afraid to experament with different sizes of petels. I cut out a bunch to play with and made another flower that I used in the following LO. Also the little leaves I used to make a additional flower in the LO as well. Have fun with it that is what it is all about!! LOL

Now for the LO that I have done using the "Grandma's Garden" kit from swirlydoos. This kit was perfect for the pictures that I wanted to scrap of my mom. She also helped make some of the flowers that I used in this LO which makes this LO even more special.

This is the whole LO. I used some super awesome stamps that I got from swirlydoos called Lablanche stamps. The image of the ladies face is one (on the left side) and then the image of the grandfather clock and flowers (on the right). I used my CTMH blending pen and ink pads to color them with. Sooo fun! I have never gotten giddy before using stamps but this time I really did!! LOL Ok now for some close ups of each side.
Left side has pictures of my mom one is the only school picture that she has of herself when she was in 2nd grade. The other picture is of her on her wedding day. She was only 16 when she married my dad! They are still married today and have been married for 38yrs!! Now my daughter is that age and there is no way I would let her get married!! My daughter has just bearly started dating.. Still that is something that is driving me nuts a little! LOL I got a fab Dusty Attic piece which is the birdcage that you see. I painted it white. Then used the stamp that came in the kit that was cracked paint look. It gave the bird cage a little aged look. I also used a little bit of distressing ink to help make it not look so bright white. Big Red flower is made by using different sizes of the apple from the above tute. The little red flower peeking out from under the Peony is made by using the little left over leaves from the apple. Ok next side!!
The Title is "Garden of Memories" I chose this title well because mom does have a garden of memories since she was in 1st grade LOL!! The Picture of her holding the baby which is me BTW she was only 17!! The Picture beside that one is one that I took on the 4th of July 2009. The other little picture that is out for debate on how old and when.. But it is one of my mom's faves of herself so had to use!! She made the bigger flower!! So pretty isn't it! She also made the small red roses and small yellow ones as well as the medium yellow orangish ones and the small yellow orangish ones.. This kit also had in it a sketch done by the awesome Beggahuna!! I like taking her sketches and making them double LO's. I entered the LO in the sketch challange that they have with each kit. I know that I don't even hold a chance with winning the challange because the gals over at swirlydoos is in a total league of thier own!! They are all so so awesome!! Just check out the Gallery over at swirlydoos and you will see what I mean.. I don't hold a chance! But what the heck it was super fun doing it!! Ok ready for some super close-ups?
Now I used Lisa G's leaves and Butterflies that she puts in the forum for use to use.. She is so awesome she makes a new file of butterflies for each new kit!! This kit also came with some Glitz sheets in it (the paper with the music notes and butterflies on it.
This is a close-up of the Leblanche stamp I was telling ya about!! I used several coats of embossing (clear) over it after I colored it and then bent it back and forth to crack it some. These stamps are super detailed and super super easy to use and clean even with archival black ink!!
I used CTMH chipboard letters for the "Garden" stamped with a Lablanche stamp that was just wording. Used Versa mark and clear embossing powder while the letters was still white then colored with ink fading one color on top of the other. The chipboard piece with the word "Memories" stamped on it is out of the "you and me" kit from CTMH. The border punches used was Mrs Martha's yeah you all know her well I bet LOL!!
Here is another close-up of the Lablanche piece (clock and flowers) and my moms flowers. Oh yeah and I used some Prima bling that I cut up and used through out the LO.

Well that is all for now.. This would have been on here last night if the electric didn't go off and stay off till 11:00!! Just saying thats all.. LOL See ya next time!!
Saturday, May 7, 2011

**** You and Me Kit ****

Hello everyone!! I have been making a LO using the Kit from CTMH that has been specialy designed to celebrate "National Scrapbooking Month".  I had the perfect pics for this kit. To me it was almost like this kit was made for these pictures. I love the stamps that come in the kit and I think are now my faves!!
Here is the full LO now I added some more goodies to the LO I just had to have some flowers and Prima bling to me LO are bare without them!! LOL

Oh and I forgot to add also butterflies! Lisa G. Has a wonderland of them on the Swirlydoos forum found here they are totally awesome!! Just print and cut them out and dress them up if you like. I added diluted create a shade pearl paint to mine. I diluted it with alcohol. Gives a nice glimmer to the butterflies. Speaking of Swirlydoos I recently joined them! I have been stalking that site way too long!! LOL So I took the plunge and did it.


Here is the Left side and below is the Right side.


Oh and I also added some vintage looking ribbon. This kit comes with the wide brown and white ribbon. I just had to add some of my flair to it. It is already set up for anyone to do. It has a guided work sheet and you can follow it set by step and still wind up with a master piece with out even breaking a sweat! Now for a bit of close ups.

Me and my mom made the 2 biggest flowers she did the begonia and I did the peonie. I thought that they looked awesome together so what the heck, I added both! I folded some large hot pink daisies in forths to tuck between them and one to the side. I did this to kinda repete the look of the flowers in the picture. I think it complemented each other nicely. The purple flowers are prima and so are the small pink and white ones. The Journaling  and tickets are some of the stamps that  come with the kit.

Some Prima pearls cut up in differnet pieces to use through out the LO. One small pack can go along way. The Leaves are also files that Lisa G. put up in the Swirlydoos forum (she is kinda awesome that way!) here.

The "Time to.." tag is also a stamp that comes with the kit as well as the swirls behind it. It also comes with more goodies that I didn't use (because I think I used enough for one LO..LOL). The paper in the kit is cardstock weight which is new to CTMH. I can't wait to see more of this stuff that is what I like. It holds up to destressing very well!! I lightly did some of the papers. But it could defantly hold up to more what ever your hearts desire.

I used the Irresistibles eclectic die cuts alpha on the word "smile" they come in white and you color them what ever color matches the LO. They are pre embossed with designes and there are four differnet designes per letter.. That is a lot of alpha!

The You and Me Kit is only $15 dollars with a $50 or more purchase / Canada is $16.50 with a $55 dollar purchase. Or you can just purchase the kit out right for $34.95 US/ $38.95 Canada. If you like the kit don't forget to hit the shop with me link that takes you right to my online store..

Coming Up next I will be doing a tute on the peonie that I did on this LO (requested by a new friend I made over at Swirlydoos Miss Debbie!) So get out your Cricut and Plantin Cart and stay tuned!! Hope fully tomorrow if the weather holds out for me. If it storms everthing is unplugged!! My golden rule because things get hit really bad were I live!! Hope you all have a wonderful Mothers Day!! See ya soon!