Monday, June 25, 2012

"LO's with Teresa Collins" Flying Unicorn spotlight

Hello everyone!

We've been featuring Teresa Collins papers this month. I love the weight and texture of these papers. There are 4 collections available in the Flying Unicorn store and they are on sale through the end of June - 30% off! That is a great deal!

 I so love how they hold up to distressing! I used water, gesso and mists and they are like no other when it comes to holding up and staying in shape! Here is a LO that I did using all of the above.. This is a LO of my Daddy and my DD giving him a kiss at Thanksgiving last year. Funny how you forget about pics that you have that are awesome! This one is super special to me!!

 I used the "Everyday moments" collection for this LO. I also used the bling that is available for this collection as well. They are a little hard to see here so let me get ya a close up of that!
 The birdcage is a TH die cut and the bird as well! I used my new Vagabond to cut them with, out of chipboard! Yes it flat cut them out too!! We have a blog hop going on July 2nd and some luck person will win one!! Totally cool! I totally love mine!! The large Flower is Manor house and the little yellow ones are Prima. You can also find these in the Flying Unicorn store.. Have another close up of this one..

 The saying is one that was in our June KOM. I really love this kit had lots of goodies to use for a long time!! The Cameo is one that I made.

 I have another LO to Share this one I used the "Linens" from TC. This is a pic of my SIL and her DD. They are such beautiful ladies!! This one I used the papers to also make some handmade flowers! I used that "Tattered Florals" die from TH. I made some Lisa Gregory "Swirly Hibiscus" flowers that I have been wanting to make since I have seen them. Also made some of my own blooms. Here is the LO.

 I used my MS punches and a couple of Glitz "Vintage Blue" elements by the title area. The DA I used gesso and then misted with some Lindy's moonshadow mist. These papers work soooooo well with making flowers!! Let me get some close ups for ya of them!

 Here is one more close up of the ones in the corner. 

 Hope you enjoyed the post and be sure to grab ya up some of these awesome from the Flying Unicorn store before they are all gone! Remember that blog hope too! See ya later!

Friday, June 15, 2012

**Mark your Calendars!**


and


Come hop with us July 2, 2012! You won’t want to miss this very special blog hop and its for 24 hours only! We’ll start off the hop at the Flying Unicorn blog at 12:01 am July 2nd and then hop on around to all our creative team members with the last stop being in the Flying Unicorn forums! The hop ends sharply at midnight on the 2nd.

The creative team will be revealing close up shots of the July kit that goes on sale July 3rd during the hop and sneak peaks of their July KOM projects. Each creative team member will randomly award a RAK to someone who leaves a comment on their blog and becomes a follower if they are not already.

The Flying Unicorn is all about challenges and we have new ones every month. We’ll be showing you our challenges during the blog hop and inviting you to participate. BUT best of all, there will be a grand prize awarded and oh my, you are not going to believe this! We’re giving away a Vagabond!!! How awesome is that? All you have to do is join us for the hop, visit all our blogs, and follow the directions to be eligible to win the grand prize!!
The Flying Unicorn blog hop begins here, at the Flying Unicorn blog. http://flyingunicornllc.blogspot.com/ Everything you need to know in order to have a chance at the grand prize will be on all of our blogs. We hope you will join us!

Thursday, June 14, 2012

"Memories of a sister" Flying Unicorn OTP

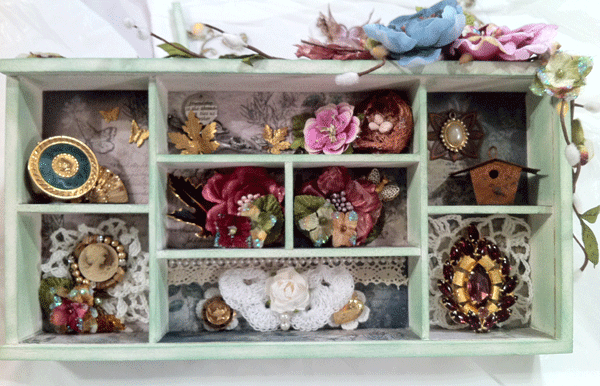
 Hey all! I would like to share with you my OTP today from the KOM. First let me say this was a cool project to work with! I am always impressed of the unique OTP that Alda comes up with!! This one is no exception! It is a memory box that is suppose to be hung up vertical, I turned it on its side.

 I made this box for my Best Friend who lost her sister to aneurysm. In this box is little elements that once belong to her sister. She was a nurse and loved to garden. So this project just seemed to scream that it be done for my friend in her sisters memory. The birdhouse from the kit is what set this all in motion. Here are my pics of it... These first sets of pics are outside views..


I used Dusty attic pieces on the front of it and a vine from Petaloo that came in the kit. The large and medium flowers are Prima. The smaller ones are Petaloo. The Dusty attic butterfly is a technique that I learn from Shona. By putting the piece in water for just a little bit and pulling the sections apart. I did this to the wings on it. I then painted it with gesso and misted it. The vines was painted with gesso as well. Inked the edges and then sprayed them as well with some mists. Took some puffy paint to the piece in select areas then painted over the puffy paint with some Shimmerz paint. How about some inside views?!


You get the little bird house in the KOM. I thought it was a cool piece and it reminded me very much of my friend. The crochet butterfly is from Cathi the rest of the doilies are ones I have gotten from here and there.. More Prima and Petaloo blooms and a Prima bird nest. I had a bunch of jewelry pieces to work with I used them as accents with other pieces. This was a super fum project to work on!!! I enjoyed it and hope you was one of the lucky ones to grab a KOM to get to one too! Hope you have a great day!

Sunday, June 10, 2012

"Maggi Magnolia"

Hello everyone, I would like to show you how to make my "Maggi Magnolia" named after the wonderfully sweet CT member and friend Maggi Harding. I had done one on a LO that I had done earlier this year and loved making it and hope you do to!

Supplies needed:
2inch circle punch (note mine is a scallop punch that I trimmed off the edges of the scallop), 1 1/4 circle punch, 7/8 sun punch, White or iridescent mist, Ink color of your choice, White and brown CS, Shaping tool, stick, tweezers, scissors, spongy mat, glue quick drying.

Step 1. Petals and Base:
You will need to punch 6 Large circles, 4 small circles. Set one large one aside for base.  
Cut all petals as picture shown. Basically notching top and each lower side of the circle.


Step 2. Coloring Petals:
Color all with ink of choice on top part edges front and back. Pounce same color on bottom of each petal like shown. Then mist with the white or iridescent mist.
Step 3. Shaping:
Shape petals as shown in below pics. Using a stick rolling top edges back  and then take tweezers grasp in center then pinch sides slightly inward to finish petal shape. Petals need to be slightly damp.


Step 4. Gluing petals:
Take 5 large petals to base. Like the pictures shown below. Glue down slightly over lapping the next one as you go. 


Step 5. Gluing down center petals:
Glue down 4 smaller petals like shown in picture below. Make sure to kinda bend down at the end of the petal to make it stand up. Not a complete bend, just a slight one. I always put a puddle of glue in the center to start this process. Again slightly over lapping them. After you have them arranged let dry and make centers.

Step 6. Centers:
Punch 3 sun shapes and litely mist with same iridescent color. 1st sun shape on mat with tool. Rolling in center with a circle motion. Your center should rise. Next 2 sun shapes cut in the center of rays one sun shape little more than the other. Being very careful not to go all the way through. then shape like the first one rolling in the center in a circle motion. you should see them standing up the deeper the cut the more tighter it will go together. On the last one gently pinch it in a little tighter. Now glue pieces inside the other. Should look like last pic when done.


Step 7. Attaching center and final result:

Glue center in the middle of your bloom and your done! Here is what it looks like when completed.


Hope you enjoy and share your results with us in the Flower Fantasy thread for a chance to win a fabby Rak!


Saturday, June 9, 2012

**Exotic Alda Lily**

Hey all! Welcome to my Flower tutorial on making my "Exotic Alda Lily"! I always name my flowers after someone so this one is for my sweet Alda! I wanted to name this one for her, because she and the team sent me some of the most beautiful flowers I had ever seen in my life when my FIL pasted away.. They had the most Gorgeous lilies in the arrangement. Now every time I see a Lily I think of the kindness I was shown during that hard time for my family and me.. So with out further a due.. Here is the supplies you will need to make this beautiful bloom!

White CS, Winter Woodland Cart, Mcgill Snowflake punch, Zig fine tip memory marker ( I think its size is .01), Ink of choice ( I used on this one TH "Victorian Velvet" Distress stain, Mist that is iridescent or a mica that is, Scissor sharp tip, Tweezers, Shaping stick, Shaping tool ( I use a BG rubbon tool hey it works!) and mat, Stylist, Glue and pearl is optional.. I have used it with and without..
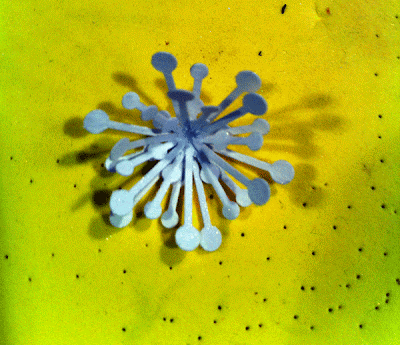
Here is the sizes I used for this tute 1 3/4 and 2 3/4, but have used different sizes also! That is why I love my Cricut  for flowers I can adjust the sizes!  You will also need 2 snowflakes punched.


First step

Cut the Shapes above following cutting instructions in pic. Do this on both pieces..


 2nd cut..

2nd Step

Color both pieces. On the edges you want to color front and back. For the center just the front of both pieces. Like pics

3rd Step

Now add Veins and Dots... My veins don't look as good as they normally do but for the sake of the tute I pressed forward! LOL On the smaller one I don't add veins. You can if you want too though..

4th step

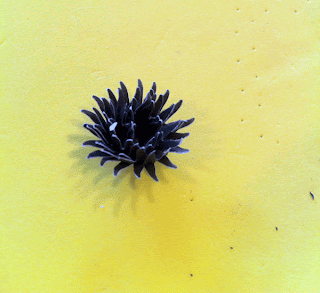
You are ready to add you mist or mica. Then start shaping with tweezers and stick after you mist or mica them. You want them damp, not soaking wet to shape. This locks in the shape that you give them. Here are pics showing this process.

 After you finish doing both of those steps on both pieces all the way around. Then dry if still damp. Now we are ready for final shaping with spongy mat ( I use a foam mat that I made gluing 2 sheets of foam from Walmart together. It is well used so forgive the shape that it is in! lol) and a shaping tool.. I use a BG rubbon tool that I have. But have also used a ink pen top that has a smooth rounded end to it. I don't have any fancy tools to work with. lol So I use what I have! Here is a pic showing this process. Go in a circular motion. This helps bring the petals up some so they are not flat and look more life like.

Here is what they should now look like.

Now your ready to glue the 2 together. Off setting them a bit. Now mist your snowflakes with same color of mist or mica you used for the main pieces. Dry quick with the heat gun and your ready for the next step.

5th step

Now shape your snowflake with stylist like pic shows. You want the snowflake prongs to stand up, by pressing in the center of them on you spongy mat. Then glue them together.


Now your ready to add to the center of your flower and put a pearl if you like. Either way I think they are beautiful! Here are the final pics.


Hope you enjoy! Have a great Day!

Friday, June 8, 2012

**Sweetheart Vine***

Hello everyone!! Tammy here! I have finally got my vine tute ready for you!! I hope you enjoy it. Please note the whole punch isn't needed.. It has been a awhile since I have make one and for some reason I thought I needed it.. I did forget to add a jewelry wire cutter. All well lets get this going! It is a very long tute so hang on with me.. lol Please be sure to read through the entire process before you start.

Supplies needed:
 I used my Cricut to cut out the daisy flower. I did a tute on the big flower that matches. There are other flowers out there that have 7 petals needed to make this flower.

Birch leaf punch, Star shaped flower punch ( I don't know the name of it but it is by paperablities)
Stems, Floral tape ( I used brown in tute but there are also other colors available)
CS, Ink for edge inking, mists I used the one pictured and some lindy's for the leaves and flower cap.
Wooden stick, glue (quick drying), Paper piercer, needle (one with a head on it).

Cutting and punching and coloring
Cut out 15 1 inch daisy flowers, 3 punched star shaped flower, 10 leaves.
Color your daisy flowers by inking edges and misting. Note you will need to do the folding part right after you mist. They need to be damp not wet when you fold them. Shape leaves with your thumb nail by creasing with the design of the leaf. then mist them as well. The mist helps highlight the creasing. Also color the star shape flower the same color as the leaves. Pierce the center of the star shape one and kinda mold around your shaping tool. Here are the pics of my colored leaves and flowers.


Assembly of the flower:

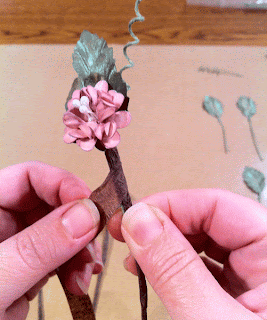
You will need 4 for the petals and 1 for base. Fold in half and side to side, the back should be in the shape of a heart. Then glue the 4 pieces around where point of the petal faces middle (Note pieces need to be dry to glue them down). Do not glue center. After pieces have been glued and the glue is dry you are ready to pierce the hole. Take 2 floral sprays and cross them and fold in half, then twist them tight to run through the pierced hole. I used a needle to help me get the spray through the hole. Here are pics of this process.


Now you are ready to take the center and attach to stem. Twist around the stem and place a small amount of glue to hold it in place this adds extra stability to the flower. See pics.

Here are some photos of the stem lengths. I just eye it really. You need one longer than the others. The longest one will be the top part of your vine. I do the same on the leaves. They however don't need to be as long as the flowers. Once you do the step up above then let them dry and glue the leaves to the stem. Note glue the stem to the back part of the stem. I got in a hurry and did it backwards. All well it turned out ok anyways. Here are the photos..


The extra stems laying below the leaves are for the swirlies. Here is pics of how I made them. You basically just wrap them around your wooden stick leaving a little unshaped so you can attach to the vine. stretch them out a bit,not to tight of a swirl. Here are those photos.


Vine assembly:
I didn't show the gluing of the leaves to the stem, thought that is a pretty easy step. After the glue is dry on the flowers and stems and leaves and stems you are ready to start the wrapping process. Take your floral tape and wrap around the flower and stem. Starting at the top and holding in place as you wrap the tape downward and pulling at the same time. The pulling on the tape makes it sticky and releases the glue. Once you have wrapped your flower then add your cap. Next add 2 leaves to 2 of the flowers and one on the last one left. Hold the leaves in place with the tape ready to make your first wrap around them. Again pulling down at the same time. Go down the length of the leaves stem. No need to go all the way down the stem again. Here is the pics of this step.


Continue to wrap all the way down on this step. Then add your cap. Here is the pics for that..

Now add your leaves as stated up above.. Here is the pics of that process..


Just wrap to the end of the stem on the leaves.. Do all 3 flowers this way.. Here is what they should look like..


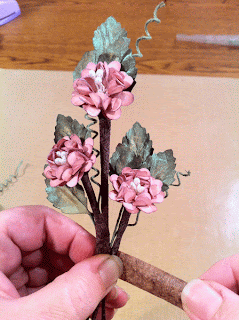
 Now take the longest one and attach a swirly and a leaf to the back of the bloom. Then wrap down about 2inches. I just eye it.. Then add the flower with the single leaf to the right with a leaf and a swirl. Pulling downward. Wrap around once or twice then add the flower on the right. After you wrap once then add a leaf and swirly in the back.. Wrap around whole piece twice and add a leaf below the one on the right in the front. Then wrap around whole piece once and add the last leaf on the left in the front. Continue wrapping all the way down till the whole piece has been wraped. Tear off tape and curl the end. If the tape tears no worries just start wrapping in the same spot that you stopped at. Here are the pics of this process and the final result...


I know this is very long but hope you find it worth it! Hope you enjoy!!