This past weekend I did a photo shoot for our church. To raise money for our youth church cabin. I got some pictures of my cousin's little girl. She is so pretty, spunky and full of energy!! She was my lighting tester. She had fun poising for me and I really enjoyed taking the pictures of her!! I am gonna use some of the photo's below to show you our special kit from CTMH for " National Scrapbooking Month". The name of the kit is called "You and Me" and it is chalked full of goodies! Here are the photos of her, all are enhanced using Florabella actions and one I used Florabella texture with.
This is the one that I used actions and textures with.. She's such a little cutie!!
Love this one too!!
Lastly this one. I think all the pictures turned out awesome for everyone! This weekend I plan on putting together one of the LO that comes with the "You and Me" kit and use the wonderful pics above. Till then my dear friends!!
Thursday, April 21, 2011
Wednesday, April 20, 2011
Playing with new Camera and Florabella!!
I just had to show you what I been cooking up... My dear sweet brother got for me!!!! He's the greatest! I was turned on to this absolutely fabulous site for editing pics in PSE or photoshop by Lisa called Florabella!! It is wonderful for enhancing photos spicing them up a bit or a lot what ever your hearts content.. Here are a few pics of my son that I have taken during a little photo shoot playing with my new camera. These are also going in my next LO so stay tuned on that one!!!
I am having a time picking which one of these 2 for my LO. I know they are close but not the same. I used the Black White Flim on bottom and Black and White Vanilla on top.. These actions are the bomb!!!!!!!!!!!!! Ok here are the ones using Ruby.. I actually got one of him smiling. This is a challange these days 13 is coming on strong!
no smile!
Smile!
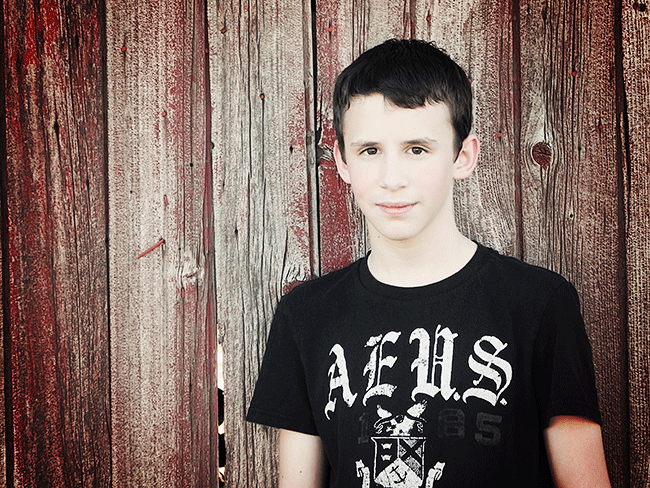
These photos were taken at my Grandma's barn. I love the texture it adds to the background of the photo. I noticed today that the storms we got last night tore down the doors on the following pics. I was even a bit worried last night we might just get a tornado. Thank the good lord we didn't!!!
Hope you like them! Let me know what you think.. In the mean time I will be working on my next LO... See Ya Soon!
I am having a time picking which one of these 2 for my LO. I know they are close but not the same. I used the Black White Flim on bottom and Black and White Vanilla on top.. These actions are the bomb!!!!!!!!!!!!! Ok here are the ones using Ruby.. I actually got one of him smiling. This is a challange these days 13 is coming on strong!
no smile!
Smile!
These photos were taken at my Grandma's barn. I love the texture it adds to the background of the photo. I noticed today that the storms we got last night tore down the doors on the following pics. I was even a bit worried last night we might just get a tornado. Thank the good lord we didn't!!!
Hope you like them! Let me know what you think.. In the mean time I will be working on my next LO... See Ya Soon!
Sunday, April 10, 2011
Magnifque
Sorry I haven't posted in a while, time gets away from me before I know it. I just completed a LO using one of my favorite paper packs from CTMH it is called "Magnifique". I love all the blue tones. I also used The "Circle of love" stamp set the goes perfectly with it. It has this wonderful image of a peacock and peacock feathers. Here is the LO and I will explain some exciting sites that I also found to get awesome SVG files that you can use with your Cricket or other cutting devices.
This is pics of my DD. She and I have stuggled with her Bipolar for years. She has grown a lot with learning to deal with it better than when she was little. There were days we would both go to bed crying. But these days it is a lot better. I am so proud of her.. She has good grades and cares a lot about them being good!!
I think this LO reflects the stormyness in her eyes that she often has. I also used florabella collection with PSE to enhance the pics still kinda new using the actions and textures. Here is a close up of the Left side.
Right side
I used Lisa's vintage seam binding technique. I also got some of the awesome seam binding that she mentions in her tute!! Its called Hug snug and it is wonderful! The Fence and Hinge that I used came from a really awsome site for SVGs here is the link to Dan's site sure you will find some goodies there as well. I don't wanna forget the free SVG site that I found and used to cut out the back ground as well here is the link to the free SVG blog that I have sumbled across.
The title that says "stormy" was CTMH "Irresitibles eclectic die cuts" they come in white with a already embossed back ground that you can color to your hearts content. I colored mine with Pacifica ink at the top and colonial white at the bottom. The colonial white dries slower so I put that down first. Then sponged in the Pacifica down into the white to blend them in together. I think it turned out pretty cool! Here is a close up of the title.
Pretty cool huh!! I also used that same idea on the "behind" in the title. They are sticker letters that was already white. I just sponged a little Pacifica at the top.
The Peacock was way fun to do as well!! It is in the "Circle of love" stamp set along with the feathers! Oh and by the way I am gonna issue my first challange to ya.. Try using Feathers in the place of leaves on your next LO using your flowers!! I have seen a lot of feathers appearing in differnet things and on my little shopping trip to Hobby Lobby got me some of them!!! Oh boy do they have all kinds of cool colors and designs on them!! I went nuts on them big time!! Here is a close up of the flower clusters and the beautiful peacock!!
After I loaded my stamp with the colors using a dobber, I added some cool glitter that my DD just had to have. I told her that it came with a condition.. That I could use it too!! I put a few color sparkles that we have at CTMH in various places on it as well. Can't forget the Prima bling also Love, Love, Love Prima!!
And of course my "Nurses Rose" just fit right in perfectly. Here is the link to the tute.
The eyes behind the word Beautiful is also My DD's. I used photo shop to cut that section out of a picture and also enhanced it to kinda look as though her eyes are coming out of clouds. Then made a tag to complete the title. I think it looks kinda cool!
Well thats it for now! Hope you like it!! Please leave me a comment and let me know what ya think!! See ya soon!!!!!
This is pics of my DD. She and I have stuggled with her Bipolar for years. She has grown a lot with learning to deal with it better than when she was little. There were days we would both go to bed crying. But these days it is a lot better. I am so proud of her.. She has good grades and cares a lot about them being good!!
I think this LO reflects the stormyness in her eyes that she often has. I also used florabella collection with PSE to enhance the pics still kinda new using the actions and textures. Here is a close up of the Left side.
Right side
I used Lisa's vintage seam binding technique. I also got some of the awesome seam binding that she mentions in her tute!! Its called Hug snug and it is wonderful! The Fence and Hinge that I used came from a really awsome site for SVGs here is the link to Dan's site sure you will find some goodies there as well. I don't wanna forget the free SVG site that I found and used to cut out the back ground as well here is the link to the free SVG blog that I have sumbled across.
The title that says "stormy" was CTMH "Irresitibles eclectic die cuts" they come in white with a already embossed back ground that you can color to your hearts content. I colored mine with Pacifica ink at the top and colonial white at the bottom. The colonial white dries slower so I put that down first. Then sponged in the Pacifica down into the white to blend them in together. I think it turned out pretty cool! Here is a close up of the title.
Pretty cool huh!! I also used that same idea on the "behind" in the title. They are sticker letters that was already white. I just sponged a little Pacifica at the top.
The Peacock was way fun to do as well!! It is in the "Circle of love" stamp set along with the feathers! Oh and by the way I am gonna issue my first challange to ya.. Try using Feathers in the place of leaves on your next LO using your flowers!! I have seen a lot of feathers appearing in differnet things and on my little shopping trip to Hobby Lobby got me some of them!!! Oh boy do they have all kinds of cool colors and designs on them!! I went nuts on them big time!! Here is a close up of the flower clusters and the beautiful peacock!!
After I loaded my stamp with the colors using a dobber, I added some cool glitter that my DD just had to have. I told her that it came with a condition.. That I could use it too!! I put a few color sparkles that we have at CTMH in various places on it as well. Can't forget the Prima bling also Love, Love, Love Prima!!
And of course my "Nurses Rose" just fit right in perfectly. Here is the link to the tute.
The eyes behind the word Beautiful is also My DD's. I used photo shop to cut that section out of a picture and also enhanced it to kinda look as though her eyes are coming out of clouds. Then made a tag to complete the title. I think it looks kinda cool!
Well thats it for now! Hope you like it!! Please leave me a comment and let me know what ya think!! See ya soon!!!!!
Monday, March 14, 2011
*****Nurse's Rose Tute*****
I am sorry about posting a little later than expected. I hope you like it! Tiffany this ones for you girl!!!
Supply list
Card stock
Circle or scallop punch sizes I used was 1 1/4" and 2"
Tourniquet cloth or I think cheese cloth will be close.
Sissors
Straight pins
Buttons of choice
Optional: Ink in a spritzer bottle to color petals. I used the CTMH bottles and ink colors used was Lagoon, Pacifica and Pear. I like mixing my own colors. Use the Create a shade Pearl paint to give a little glitz if you want.
Step 1 Circles
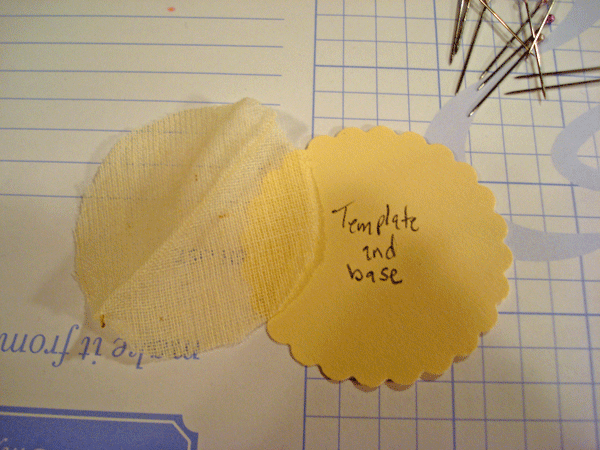
Punch 1 size circle out of cardstock for template. You will need 33 circles to create this flower.
Each petal will be 3 circles. The bottom of the flower will have 6 completed petals and the top part is 5 completed petals.
Step 2 Prep for assembly
Place cut circles in stacks of 3 for assembly of petals. I also used my punched cardstock circle as base
(double duty)
Step 3 assembly of petals
Take your stack of 3 circles and fold as shown and use a pin to secure after folded. Do this to each stack of circles.
first fold
2nd fold
3rd fold now your ready for your pin. Add it to the bottom to hold petal for arranging or coloring
Step 4 coloring Petals **optional**
Now is the time to color them if you like. You don't have to because the natural color of the cloth has a vintage vibe. I colored mine. I used the lite color at the top of the petal and dark at the bottom or were the center will be. On the large flower I used 3 colors. On the small one I used 2 colors. Let dry after coloring.
Step 5 attaching to base
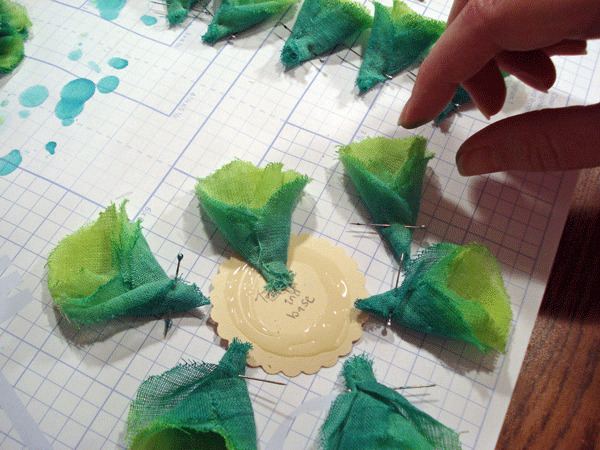
Apply glue on base. Remove needles before apply them. Bottom layer is 6 petals and top layer is 5 petals. Make sure you stagger the top 5 over the bottom 6. Like shown below.
Step 6 center of flower
After all petals are attached then pick a button of choice to complete your new flower.
Here is all 3 I made doing this tute plus the one that I made earlier.
The smaller ones are the 1 1/4" circle punch. The Larger is the one that was a scallop punch. Here is the first one that I made.
Thanks for stopping by!! I really hope you like them. Good night to all and God bless!
Supply list
Card stock
Circle or scallop punch sizes I used was 1 1/4" and 2"
Tourniquet cloth or I think cheese cloth will be close.
Sissors
Straight pins
Buttons of choice
Optional: Ink in a spritzer bottle to color petals. I used the CTMH bottles and ink colors used was Lagoon, Pacifica and Pear. I like mixing my own colors. Use the Create a shade Pearl paint to give a little glitz if you want.
Step 1 Circles
Punch 1 size circle out of cardstock for template. You will need 33 circles to create this flower.
Each petal will be 3 circles. The bottom of the flower will have 6 completed petals and the top part is 5 completed petals.
Step 2 Prep for assembly
Place cut circles in stacks of 3 for assembly of petals. I also used my punched cardstock circle as base
(double duty)
Step 3 assembly of petals
Take your stack of 3 circles and fold as shown and use a pin to secure after folded. Do this to each stack of circles.
first fold
2nd fold
3rd fold now your ready for your pin. Add it to the bottom to hold petal for arranging or coloring
Step 4 coloring Petals **optional**
Now is the time to color them if you like. You don't have to because the natural color of the cloth has a vintage vibe. I colored mine. I used the lite color at the top of the petal and dark at the bottom or were the center will be. On the large flower I used 3 colors. On the small one I used 2 colors. Let dry after coloring.
Step 5 attaching to base
Apply glue on base. Remove needles before apply them. Bottom layer is 6 petals and top layer is 5 petals. Make sure you stagger the top 5 over the bottom 6. Like shown below.
Step 6 center of flower
After all petals are attached then pick a button of choice to complete your new flower.
Here is all 3 I made doing this tute plus the one that I made earlier.
The smaller ones are the 1 1/4" circle punch. The Larger is the one that was a scallop punch. Here is the first one that I made.
Thanks for stopping by!! I really hope you like them. Good night to all and God bless!
Sunday, March 13, 2011
Thoughts and Prayers Going Out To Those in Japan
As I sit in the confort of my home safe, kids safe and all seems to be well at the moment. I see the images of the devastation that came from the earthquake and tsunami. I pray for the ones missing and the lives lost. God be with you all.
Sunday, March 6, 2011
My Mom's Keepsake box
First, let me say thank you to all that has kept my cousin and her family in prayer. She as of last word is doing better may get to move out of ICU! That is wonderful and we are greatful to God that he is allowing us to keep her in our lives! She had multiple brain aneurisms. Most do not go on after this happens and we are all very aware of this. Please keep the prayers going she is still not out of the woods yet, as the doctor has told us of the possible complications of the surgery. Lisa thank you for your very kind words and prayers as well!! Hugs to you!!
On to my mothers box..
I had a fun time doing this box. Its always fun to make things for those you love and I do love my mom very much!! This is the top of the box. I keep saying CTMH, Prima and Mr Holtz is a wonderful match!! LOL
I hand cut the "R" it is actually our (CTMH) Baroque Alpha. I scanned the carrier sheet and used PSE to get it to the size I needed then cut out the negitive areas and laid it over our New "Wings" paper I so love this paper as you can tell!! LOL The Box itself is also CTMH keepsake box. I think that the box isn't currently unavailable. I think it is a seasonal item. Here is a close up of the top.
The flowers are mostly Prima. I REALLY LOVE Prima!!! The Leaves are ones that Lisa has put up on the Swirleydoo's Forums here. I hope I did that right.. Still learning my way around the blog world.. LOL Also the littler leaves are from the CTMH "Just blooms". Here is another angle.
I always coat my boxes with Royal Coat Decoupage Finish before I add The embellies to them. Butterfly is Prima and the Swirl under it as well. Now for the tour around the box. Front of it.
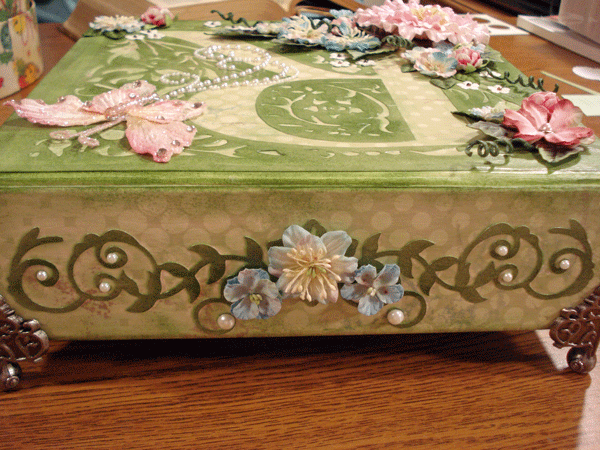
I used the Tim Holtz feet as well as his bracket that shows my mom's name. I used my cricket to cut out the die cut using the MTC program. I got the SVG file from SVGCUTS.com The Pearls are CTMH Opaques I used both sets. The other sets I used on the tiny blooms to give them a center. Here is the sides and back to the box. I used the MTC program and SVGCUTS for them as well as a dash of Prima..
leftside
back
This is the right side.
I have also wrote a poem to put in the box on the inside. The title is "Little things".
Little things to put in a box.
Little things you don't want to lose.
Little things that give your memory a start.
Little things to keep close to your heart.
Little things to make you smile.
For those little things are big things every once in a while.
Well this is a long post and it is getting late. Going to do a tute on the "Nurses Rose" for my dear sweet friend and scrapping sister Tiffany!! She is my Pastor's wife and my very dear friend. She is a Nurse, so this one will be for her!! Good night all and God bless!!
On to my mothers box..
I had a fun time doing this box. Its always fun to make things for those you love and I do love my mom very much!! This is the top of the box. I keep saying CTMH, Prima and Mr Holtz is a wonderful match!! LOL
I hand cut the "R" it is actually our (CTMH) Baroque Alpha. I scanned the carrier sheet and used PSE to get it to the size I needed then cut out the negitive areas and laid it over our New "Wings" paper I so love this paper as you can tell!! LOL The Box itself is also CTMH keepsake box. I think that the box isn't currently unavailable. I think it is a seasonal item. Here is a close up of the top.
The flowers are mostly Prima. I REALLY LOVE Prima!!! The Leaves are ones that Lisa has put up on the Swirleydoo's Forums here. I hope I did that right.. Still learning my way around the blog world.. LOL Also the littler leaves are from the CTMH "Just blooms". Here is another angle.
I always coat my boxes with Royal Coat Decoupage Finish before I add The embellies to them. Butterfly is Prima and the Swirl under it as well. Now for the tour around the box. Front of it.
I used the Tim Holtz feet as well as his bracket that shows my mom's name. I used my cricket to cut out the die cut using the MTC program. I got the SVG file from SVGCUTS.com The Pearls are CTMH Opaques I used both sets. The other sets I used on the tiny blooms to give them a center. Here is the sides and back to the box. I used the MTC program and SVGCUTS for them as well as a dash of Prima..
leftside
back
This is the right side.
I have also wrote a poem to put in the box on the inside. The title is "Little things".
Little things to put in a box.
Little things you don't want to lose.
Little things that give your memory a start.
Little things to keep close to your heart.
Little things to make you smile.
For those little things are big things every once in a while.
Well this is a long post and it is getting late. Going to do a tute on the "Nurses Rose" for my dear sweet friend and scrapping sister Tiffany!! She is my Pastor's wife and my very dear friend. She is a Nurse, so this one will be for her!! Good night all and God bless!!
Wednesday, March 2, 2011
PRAYERS NEEDED PLEASE
Hello all of my scrapping friends. I have a request from you out there in the cyber world. Please pray for my cousin. She is in ICU at this time. She has 2 sweet kids and they need thier mother. I know that the doctors and nurses have done what they can. Now it is in the good Lord's hands. I know that prayers work and believe in them. Her name is Christy and I love her and her family very much. They need all the prayer that we can give them. Thank you all very much..
Subscribe to:
Posts (Atom)